Lissa Anglin • Part of Me Blog

Art, décor, family and photography- it's all part of me!

AnglinAbode

#anglinabode master bathroom reno

AnglinAbode, HOMElissa-anglin2 Comments

Goodness, it’s been a while since I’ve done a blog post, but this HAD to be documented! We’ve finally completed the master bathroom renovation for our Anglin Abode!

When we purchased this home, we knew we’d want to do a major renovation here, and so once the kitchen was done, we started saving for the master bathroom. I’d been calling it my “dorm bathroom”, because that’s what it felt like- barely functional with little to no storage.

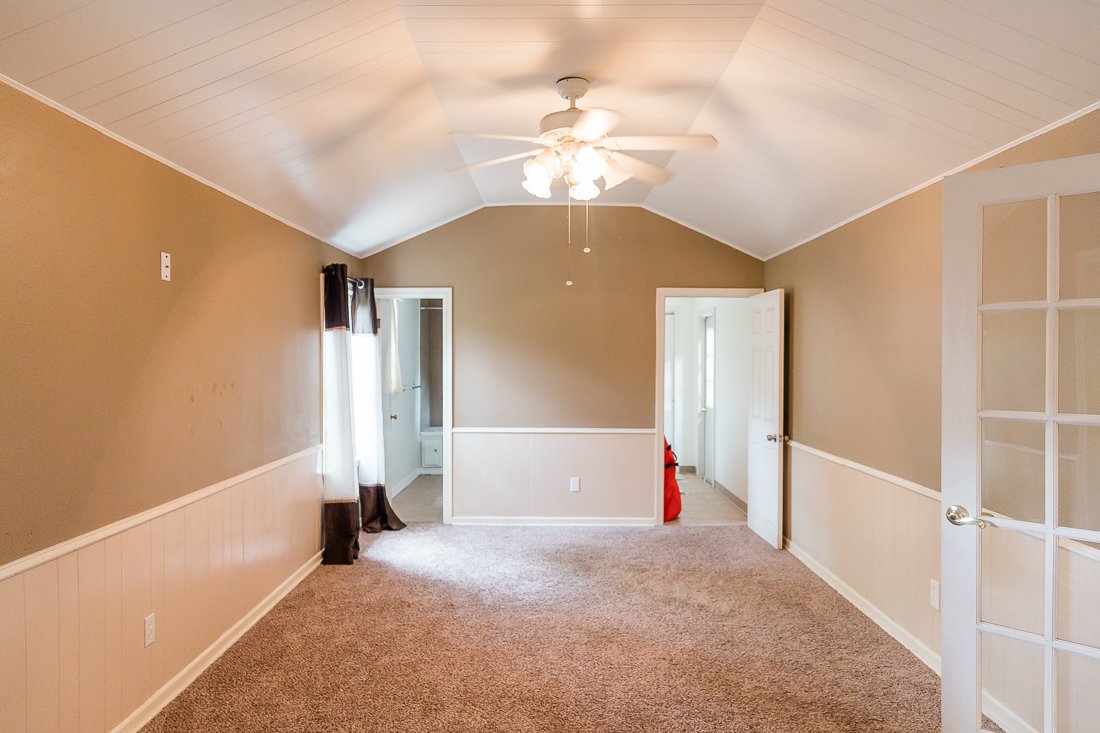
The bathroom is located at the very back of the house and was clearly a DIY add-on. It was essentially a square space that had been divided into two halves- one side being the bathroom and one being the laundry room. You can see the two doors in this old house photo below- the left is the bathroom and the right is the old laundry.

Here’s the left side- our “dorm bathroom” with basically no storage, and the toilet so close to the door I couldn’t even get it in this shot, haha!

And the other side- old laundry room. There was a door to the exterior that we ultimately decided to close in.

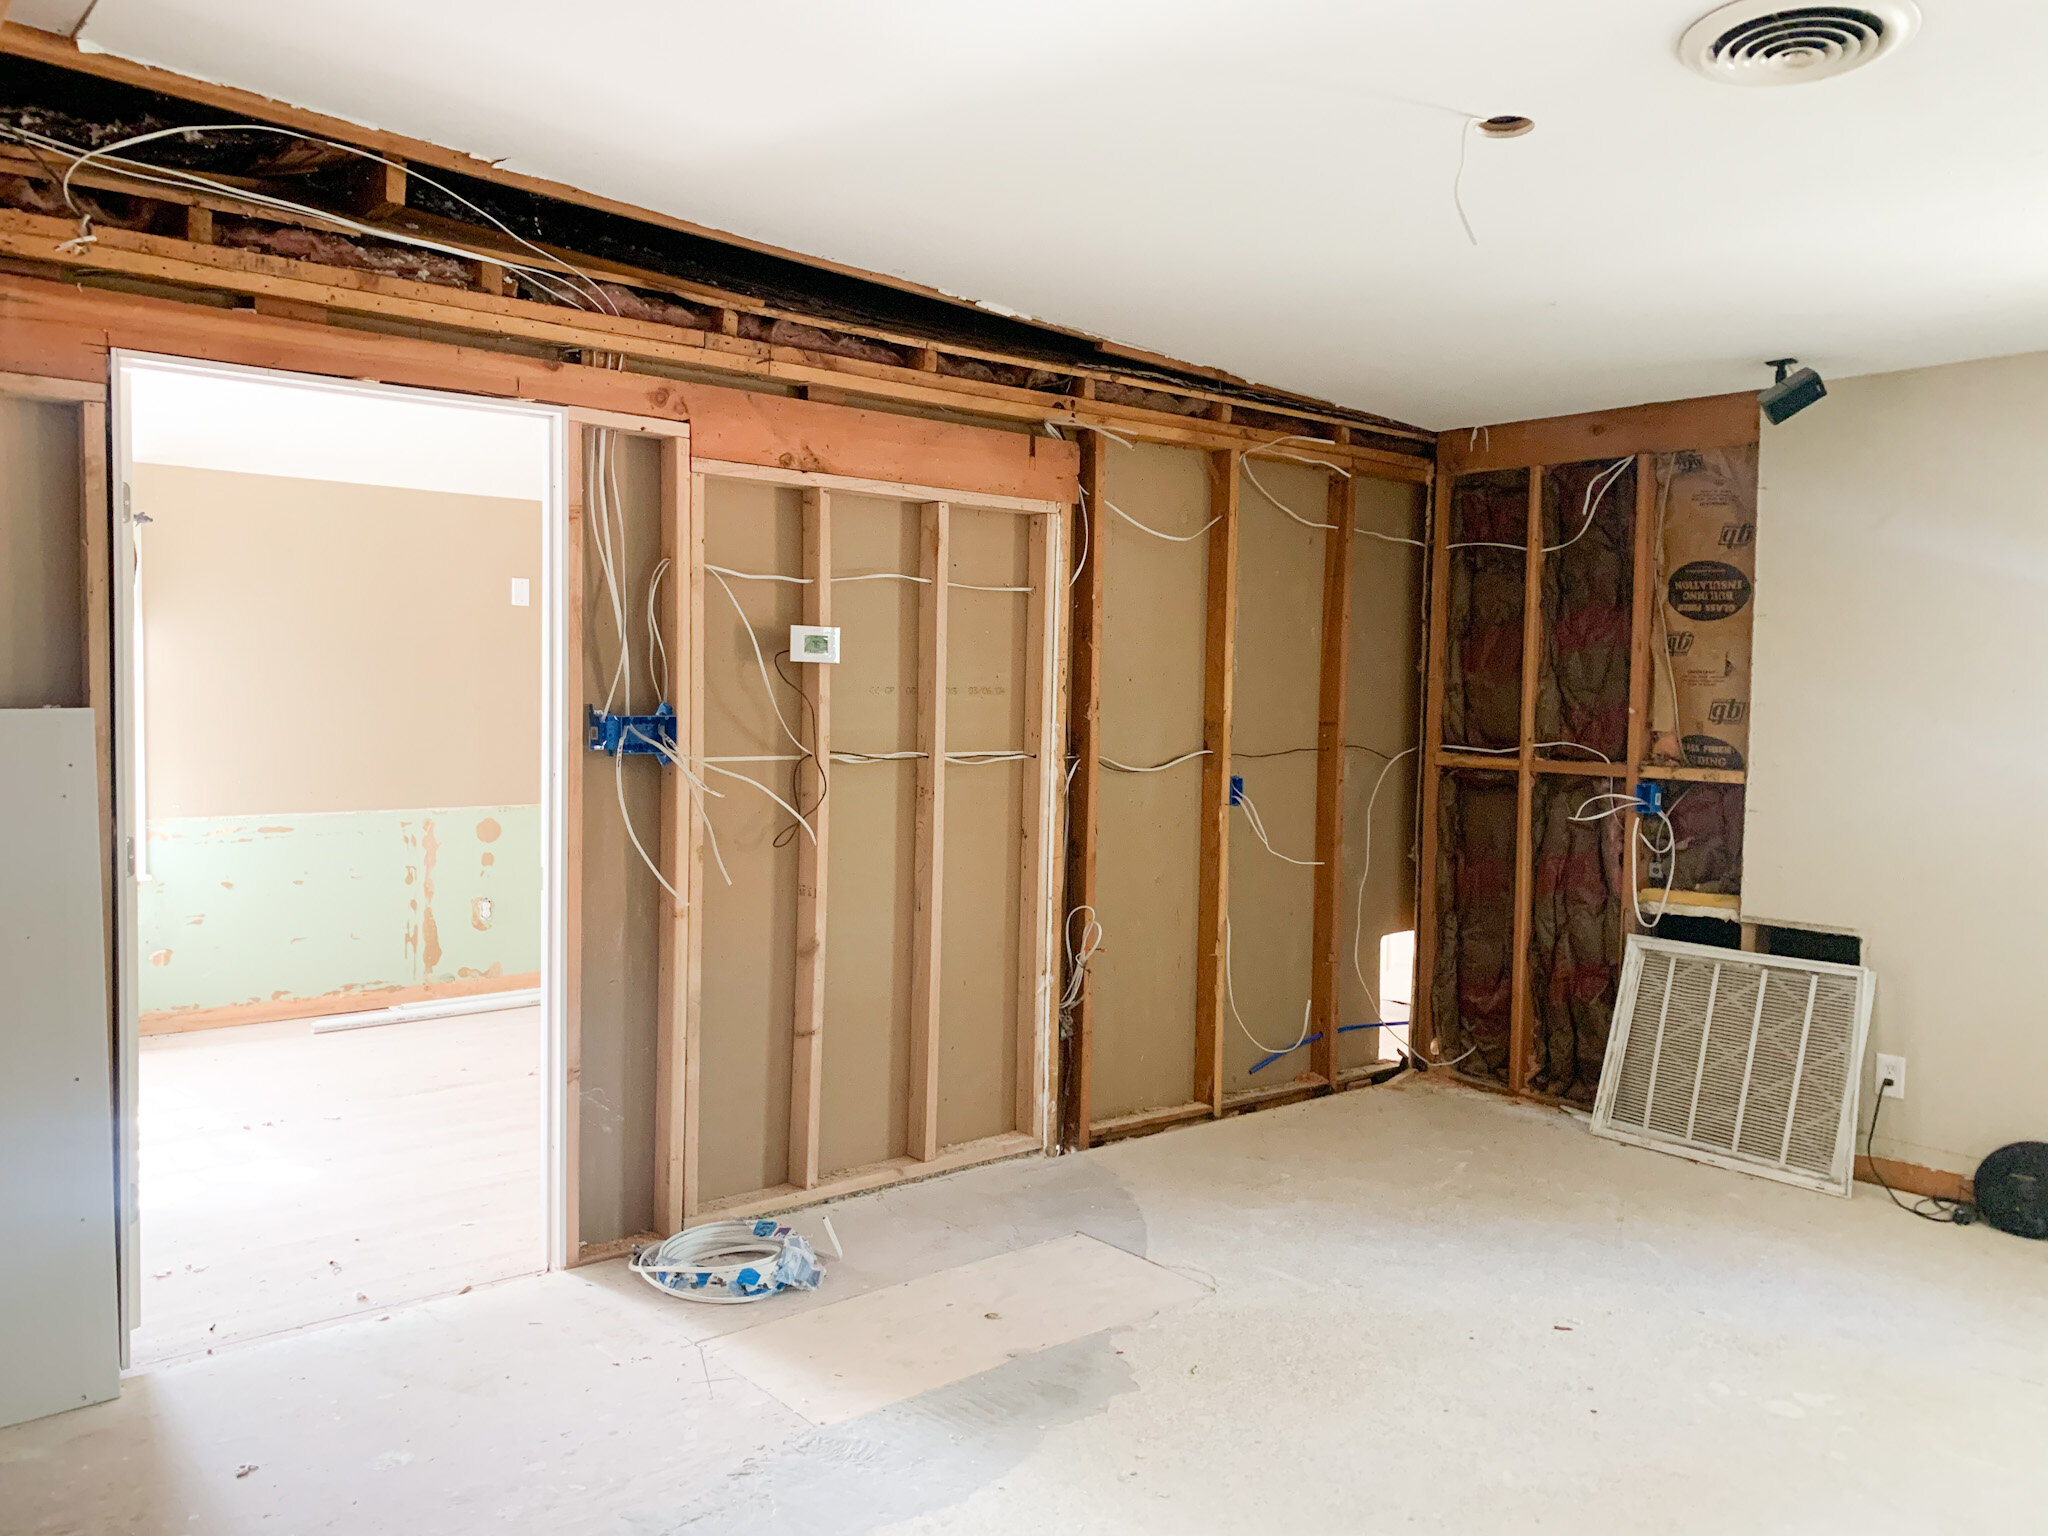
I COULD NOT WAIT to see what it looked like once that middle wall was removed. Here’s what it looked like! You can see the spot where the bathtub once was was in really bad shape, and we also had to contend with the water heater that was basically in the middle of the room.

Here is my sketch of the same wall.

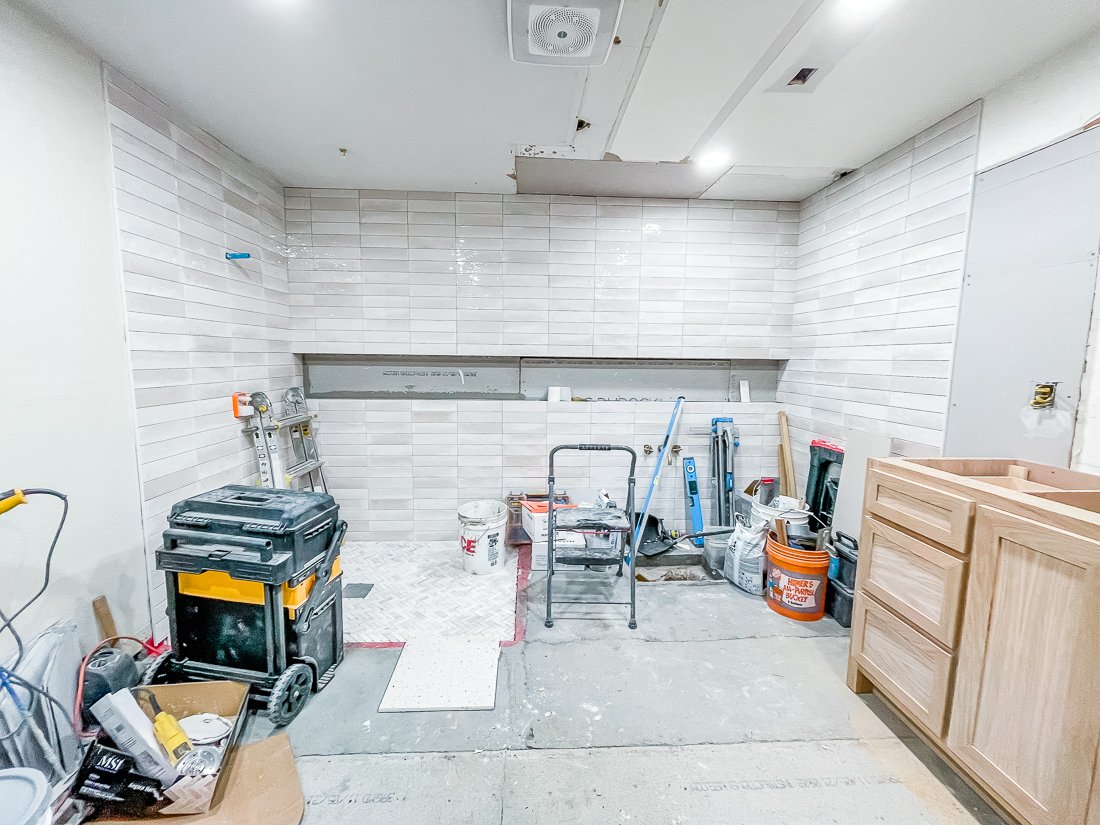
In progress:

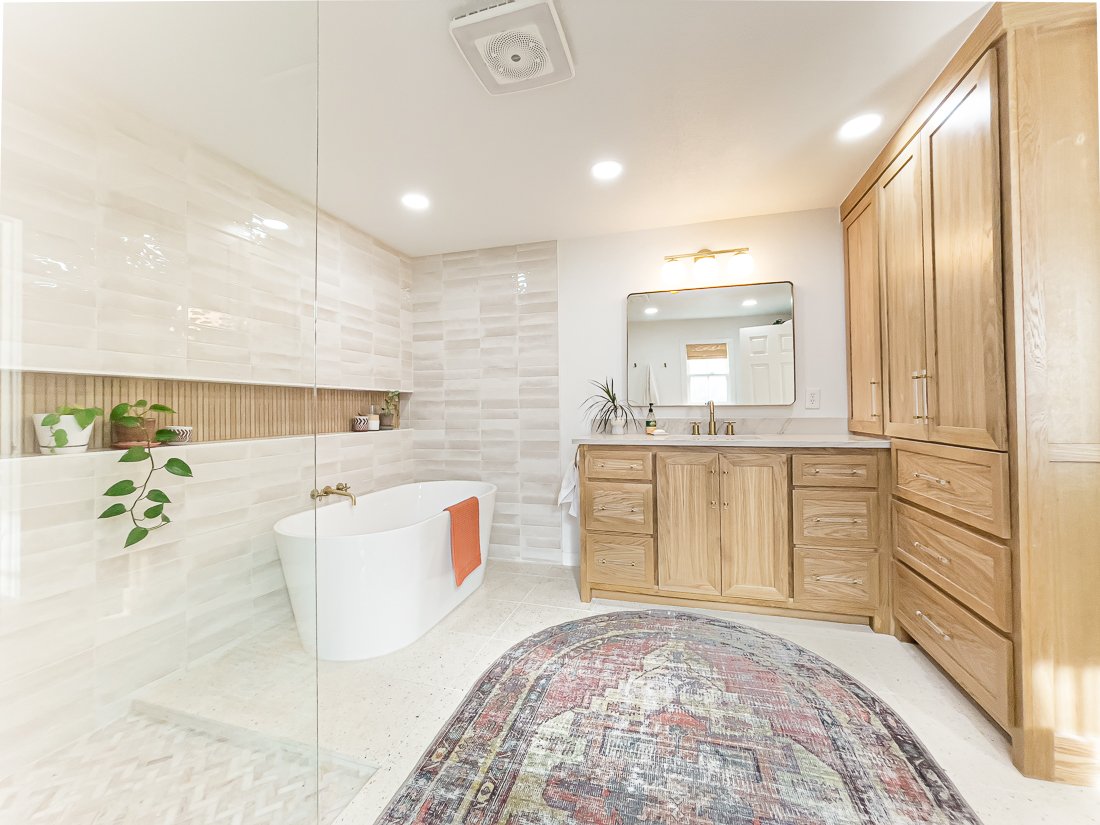
And the final!

East wall before:

My sketch:

And after!

We are so in love with the way everything turned out. The square layout of the room was the biggest challenge for me, because I was set on having this semi-open shower and tub layout.

You can see below I was trying my darndest to squeeze in 2 vanities, but we eventually decided against this in order to create a more spacious feeling in the room. I also didn’t want to compromise any of that countertop (a.k.a. curling iron) space with 3 girls in the family. Thankfully, Shawn didn’t mind and so we share a sink.

I also added in a floor-to-ceiling linen closet which was much-needed. This and the vanity gives us plenty of storage and keeps the rest of the room very open feeling.

My original design also included a curbless shower and a shower niche that extended all the way across the back wall, so that it is useful for both the shower and the tub, and adds interest to the completely tiled back wall. Our contractor eventually convinced me to add a small (it is maybe 1.5”) curb to the shower just to contain the water a bit better, and I am really happy with the way it turned out. This also meant I needed to add a 4th(!) type of tile to the design.

The large shower niche was also a bit of a challenge. Remember the huge water heater that was smack dab in the middle of this back wall? We ended up swapping it out for a tankless water heater that is located in a storage closet adjacent to this room and it was one of our more costly choices, but SO worth it. I love having hot water almost immediately when we turn on the faucet- and in this 76-year-old home that is something I don’t take for granted.

Instead of creating the shower niche inside the existing wall, our contractor essentially built a faux wall on top of the structural wall, and that allowed us to run plumbing for the bathtub and create this long niche. I love the way the horizontal line creates a steady, linear design, and place for my little plants!

Let’s talk about finishes!

I wanted our bathroom to be a very peaceful, spa-like space that would feel clean and cozy. I had tons of great inspo on my Master Bath Pinterest board, but unfortunately most of the finishes there were just way out of our budget. So, my goal was to create the same look on a budget.

I was crushing over this tile from Bedrosians, but it was just too expensive for us- so I ended up with this similar tile from Home Depot, which had the same warm white and color variation.

My biggest splurge and my favorite thing in our bathroom is the terrazzo tile floor from TileBar. I’m obsessed.

The wood-look tile in the niche is also from TileBar and was backordered for a couple of months, but it was worth the wait. It matches our white oak cabinets perfectly.

I also struggled to find the right size and type of rug that would fit this space, and was so excited when I found this WASHABLE rug! It is thin but absorbent. Because of the placement of our toilet, a rectangular shaped rug was too large- so the oval was a perfect solution.

I did not initially plan on doing natural stained cabinets, but once I realized how light everything else would be in the room, I decided it would ground the space better to keep the cabinets natural. These are white oak with a clear coat finish. I loved the acrylic and gold handles I found, too- I like that they let the wood grain shine with just a touch of the gold that runs throughout our house.

The countertop is quartzite- similar to what we have in our kitchen. I love the soft grey and how it picks up the same tones in the wall tile.

All in all, we are super pleased with the space and it functions beautifully for our family. I love that I have a peaceful little spot and that it can essentially turn into a big steam room when the shower’s running.

I will link everything I can here!

Contractor: Allure Kitchen & Bath (they were so great to work with- we already have them started on another project!)

Wall & Trim Color: Pure White by Sherwin Williams

Floor Tile • Shower Floor TileShower Niche TileShower Wall TileVanity Light

CLICK HERE FOR ALL OTHER FIXTURES + ACCESSORIES

major front porch glow up!

AnglinAbode, DIY, HOME + LIFESTYLElissa-anglin1 Comment
IMG_0286-2.jpg

My front porch space has received basically all my love and attention since the weather’s warmed up. It’s essentially my new living room and I have loved sitting here to read, pray, and watch kids play. I’ve been wanting to cozy it up and when I realized that Cricut made pillow covers, I knew I wanted to create some custom pillows for this space.

First, let’s talk about what the patio looked like before:

2021-04-10 16.38.15 HDR.jpg

Pretty blah. The 14’ pew bench came with the house when we bought it (score!), and the metal “A” sign is one we’ve had- Shawn hung it up for me not long ago. But there was a LOT I wanted to do to this space.

First, I tackled the door. It was brown and beat up. We’d already replaced the decorative frosted glass with more modern rain glass, but I wanted to add a pop of color and change out the handle. So that’s what we did! I painted it the same color as our kitchen island- Relentless Olive from Sherwin Williams- and we switched out the gold curved handle for a more modern black one.

My favorite hint for painting any type of wood (or even faux wood)- use deglosser! Saves you hours of sanding and allows the new paint to adhere perfectly!

LissaAnglin_PartofMeBlog_0088.jpg

Once the door was done, I set my sights on the church pew. It was in ok condition- but was cracking in some spots and I suspect someone tried to stain it at some point and didn’t do a great job- it was super uneven. The easiest thing would have been to paint it, but I wanted to keep it a wood tone, so I started sanding.

You can see how the pew really needed some love here. I wanted to lighten it up so it didn’t blend in with the brick as much, so that is the reason I decided to sand!

You can see how the pew really needed some love here. I wanted to lighten it up so it didn’t blend in with the brick as much, so that is the reason I decided to sand!

2021-06-17 07.42.02.jpg

It took me a couple of days to sand all 14 feet of it, but it was worth it. Once sanded, I wiped straight-up cheap bleach on it to lighten the overall color. I ended up doing this about 3 times and it worked beautifully. My Vintage Porch has a great tutorial on this that was very helpful.

Once everything was sanded, I used some wood filler to repair some of the cracks in the wood. This is my favorite kind to use because the color changes letting you know it is dry.

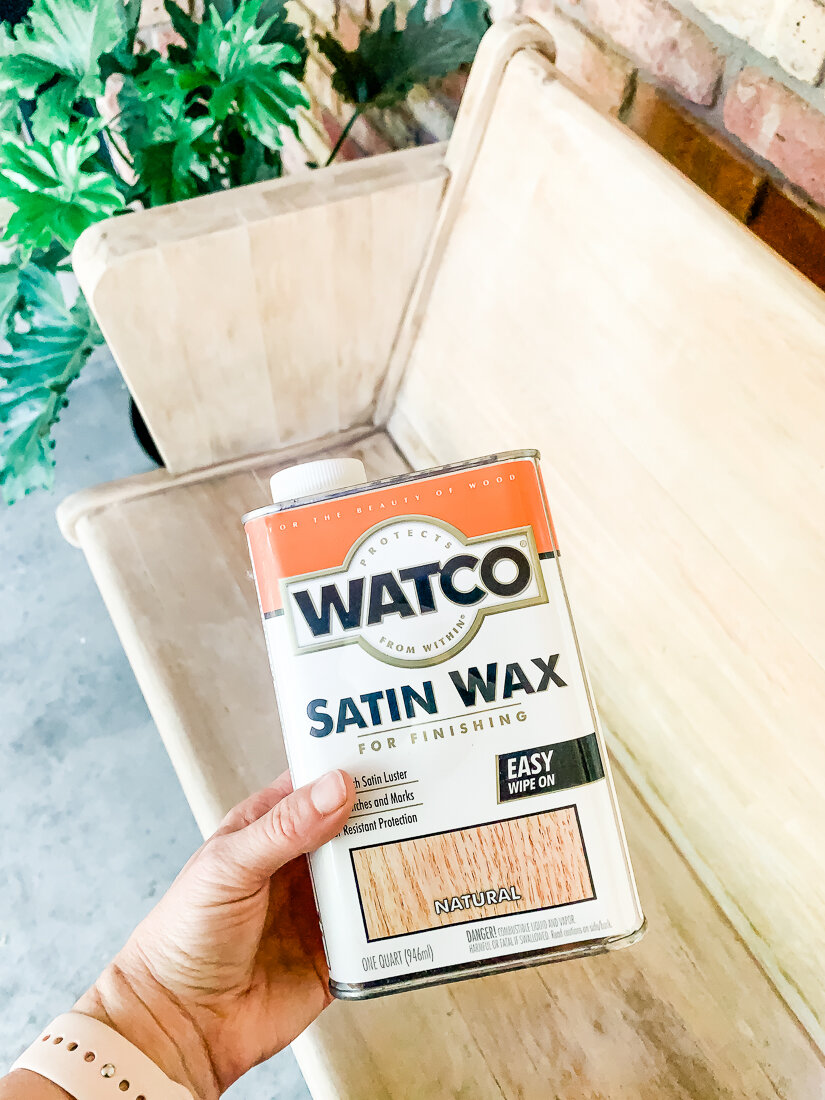
After bleaching, I coated it with Watco Satin Wax to give it a little protection. I wanted to keep the light look but also protect the wood I had just worked so hard to uncover. This did the trick! Once it went on, it did darken the wood a bit, and I panicked, but then it lightened again as it dried.

2021-06-17 09.01.03.jpg

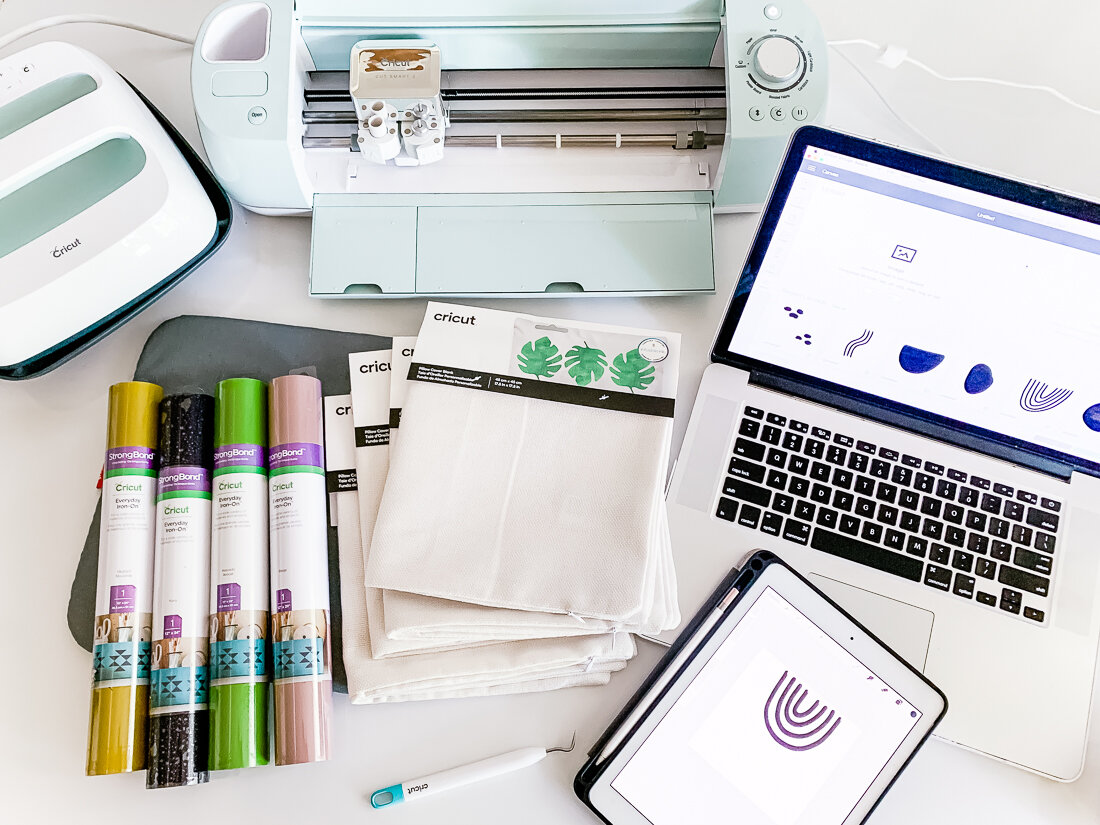
Now for the fun decorative stuff! I made the pillows using my Cricut Explore Air2 and Cricut Easy Press. Their heat press products and tools are so much fun. I ordered basically everything from Cricut and here is a list of the products I used:

Cricut Explore Air 2

Cricut Easy Press + Easy Press Mat

Cricut Everyday Iron-On (I used beige, avocado, black and mustard for these pillows)

Cricut Pillow Covers

Cricut Weeding Tools

I drew all the doodles and shapes on my iPad, then uploaded them to Cricut Design Space. From there, I made 4 different compositions for 4 pillows, and cut them on the 4 different colors. A few of my design elements were too large to be cut on my 12x12 mat, so I had to slice them and cut them in sections, then put them back together when it was time to heat press them.

I’ve uploaded my design file to the Cricut Design Space Here, and you can use it for free!

IMG_0306.jpg

Organic Shapes Collage Pillows

FREE Cricut Design Space filed linked here!

Then, it was collage time!

All my shapes are weeded and it’s time to start collaging them onto the pillow covers using my Easy Press!

All my shapes are weeded and it’s time to start collaging them onto the pillow covers using my Easy Press!

The Easy Press makes it really simple to adhere the Iron-On to the fabric. You just set your temperature and time, push the “C” button, and it times it all for you.

I adhered the bottom layer first and then added additional layers, being sure to keep all Iron-On Material covered with the transfer film (even if it was already adhered) under the Easy Press (or else it would melt!).

I was really pleased with how these turned out and love the quality of the Cricut Pillow Covers. They are perfect for my patio space.

IMG_0303-2.jpg

Lastly, I found a cute little metal coffee table (it was already pink, and I was great with that!) on Facebook Marketplace and pulled out a few pillows and a Mexican blanket I already had.

I had purchased this floor runner for our kitchen and ended up not liking it, but it worked perfectly folded hot-dog style on our bench as a pseudo-cushion! Here’s the final reveal:

IMG_0322.jpg
IMG_0327.jpg
IMG_0302.jpg

I’m so thankful for this space. I never set out to have a matching set of anything- but I do my best to buy and create things that I love- which, it turns out, kind of all go together.

It’s been a collection of little projects that make a big impact on my attitude- I love sitting here and just enjoying every little thing- and I have big intentions for the conversations, wine nights, and prayer times to be had here.

a quick d.i.y. sun shade for the backyard

DIY, AnglinAbode, LIFESTYLElissa-anglin13 Comments
IMG_3308.JPG

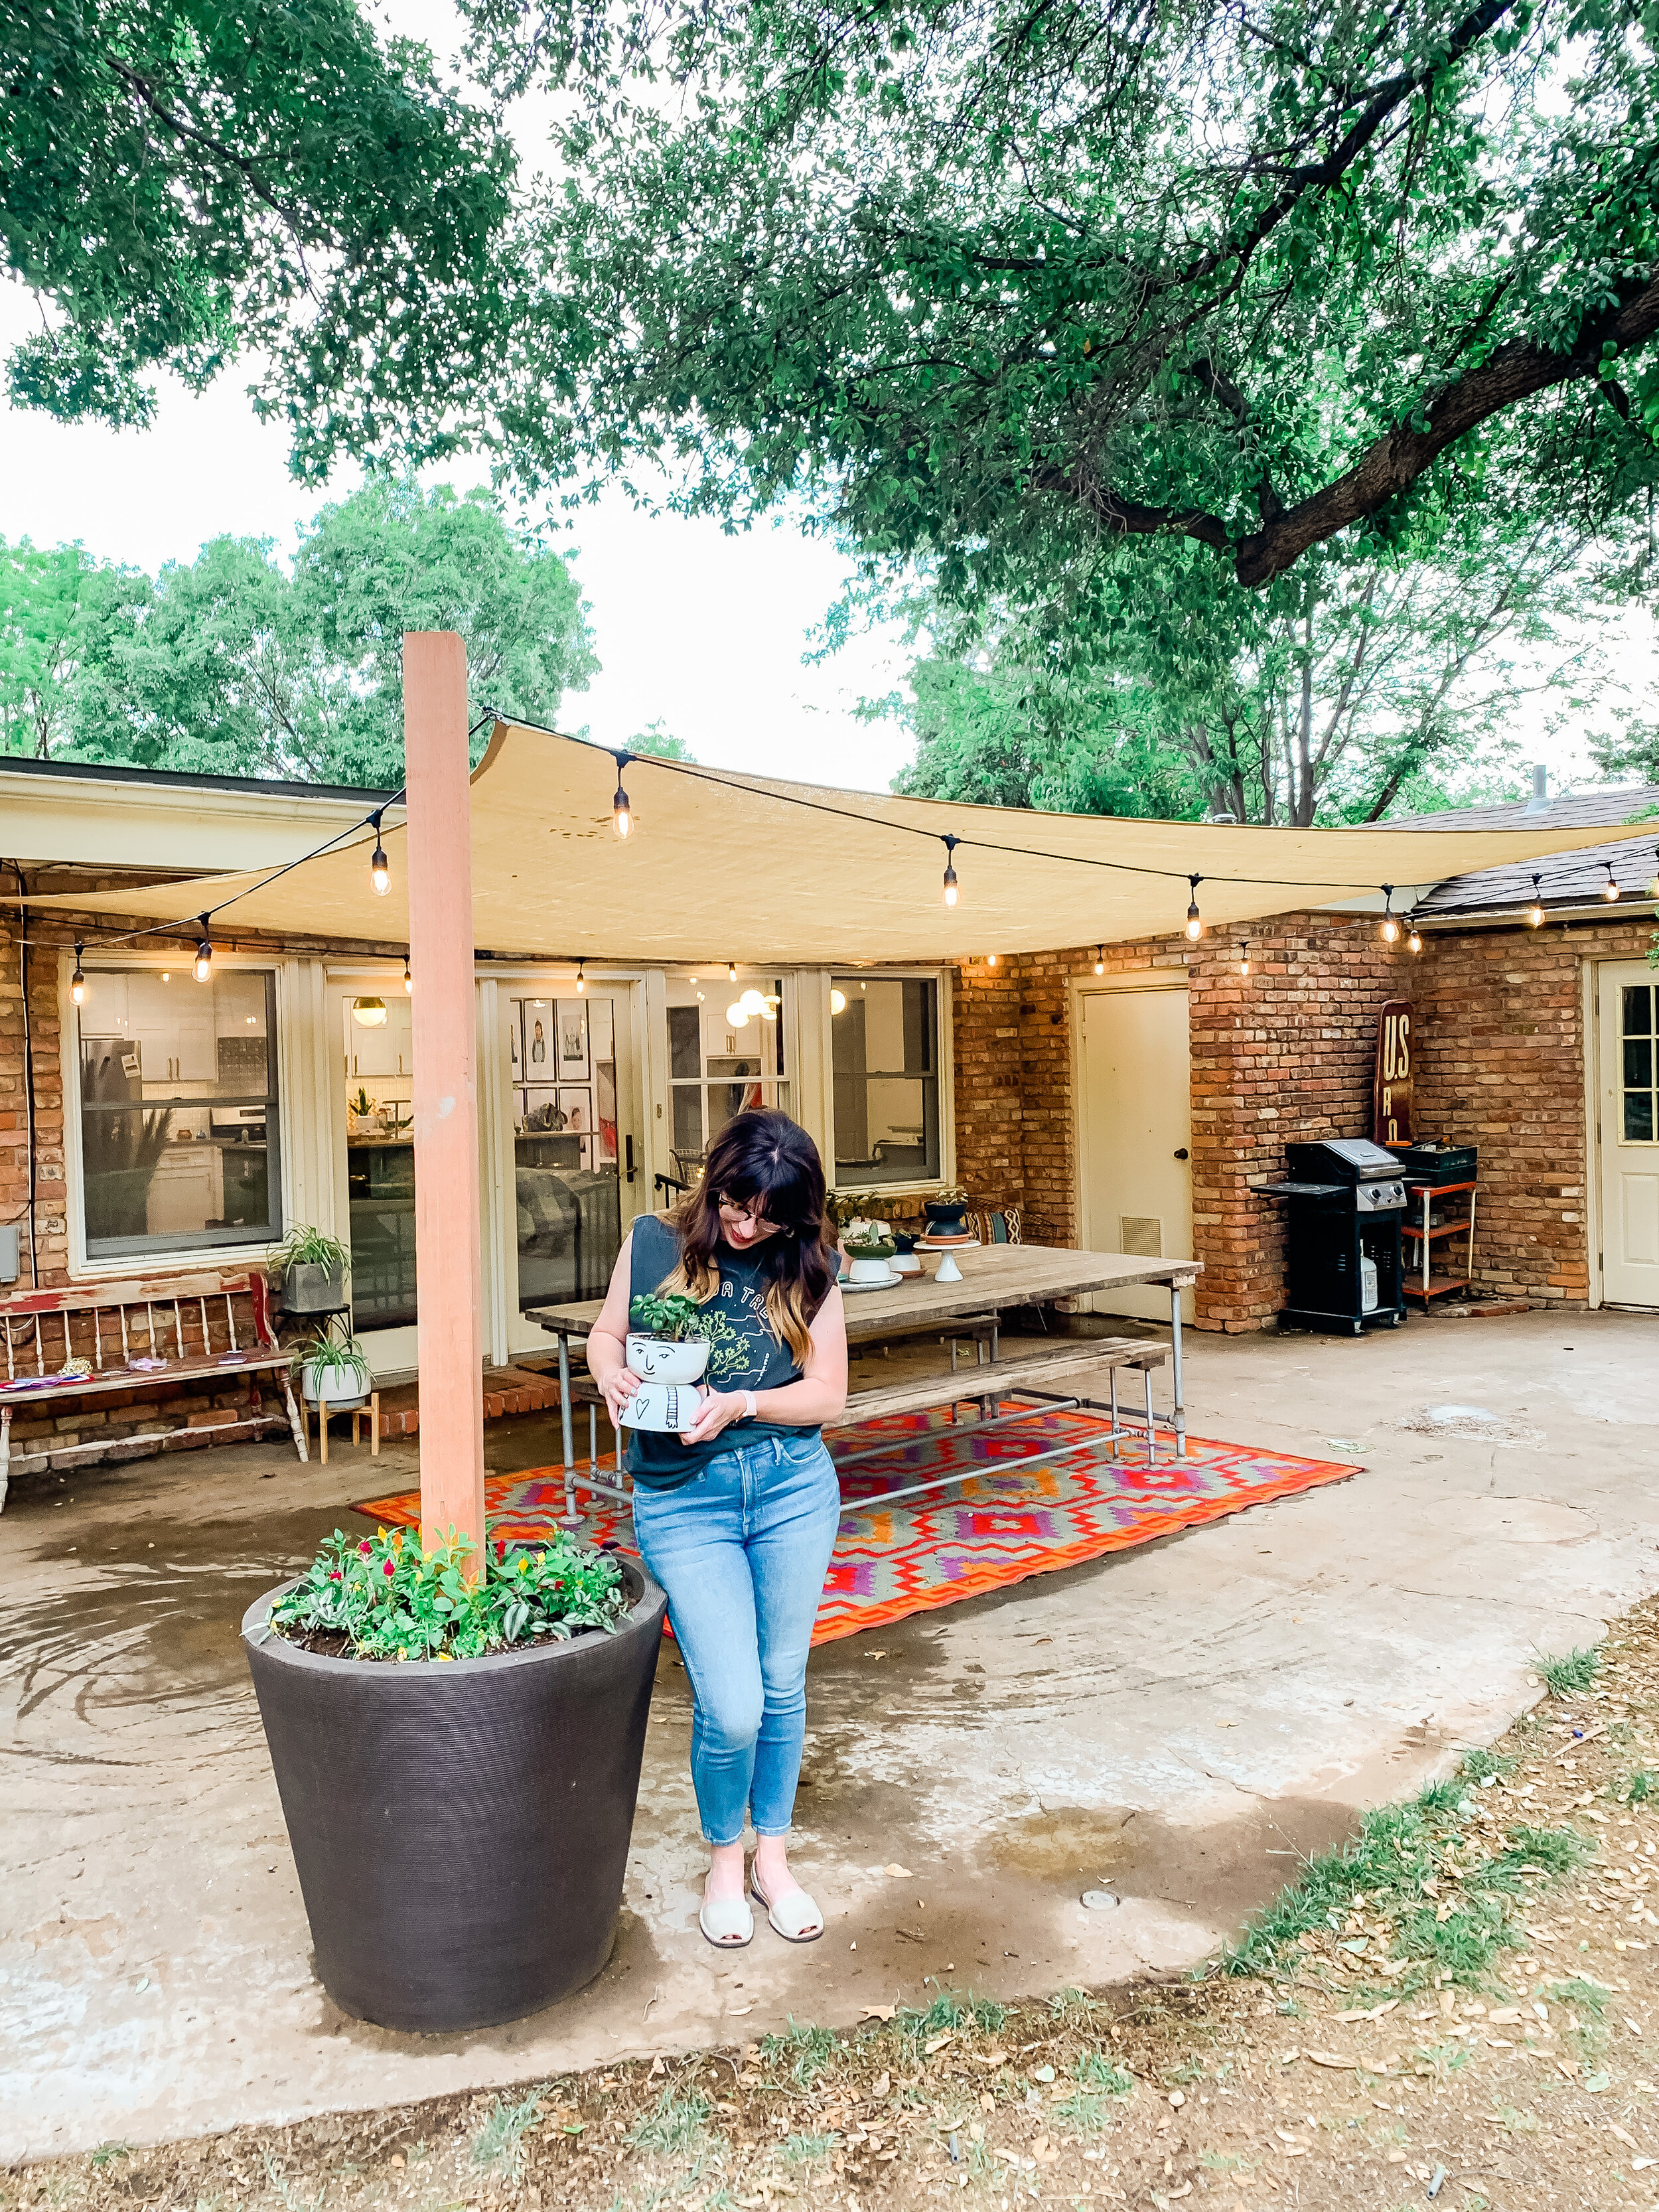
I’m excited to show you this quick and relatively inexpensive project for creating a sun shade patio area. We created our own planter post to act as an anchor point for the sail and it worked beautifully.

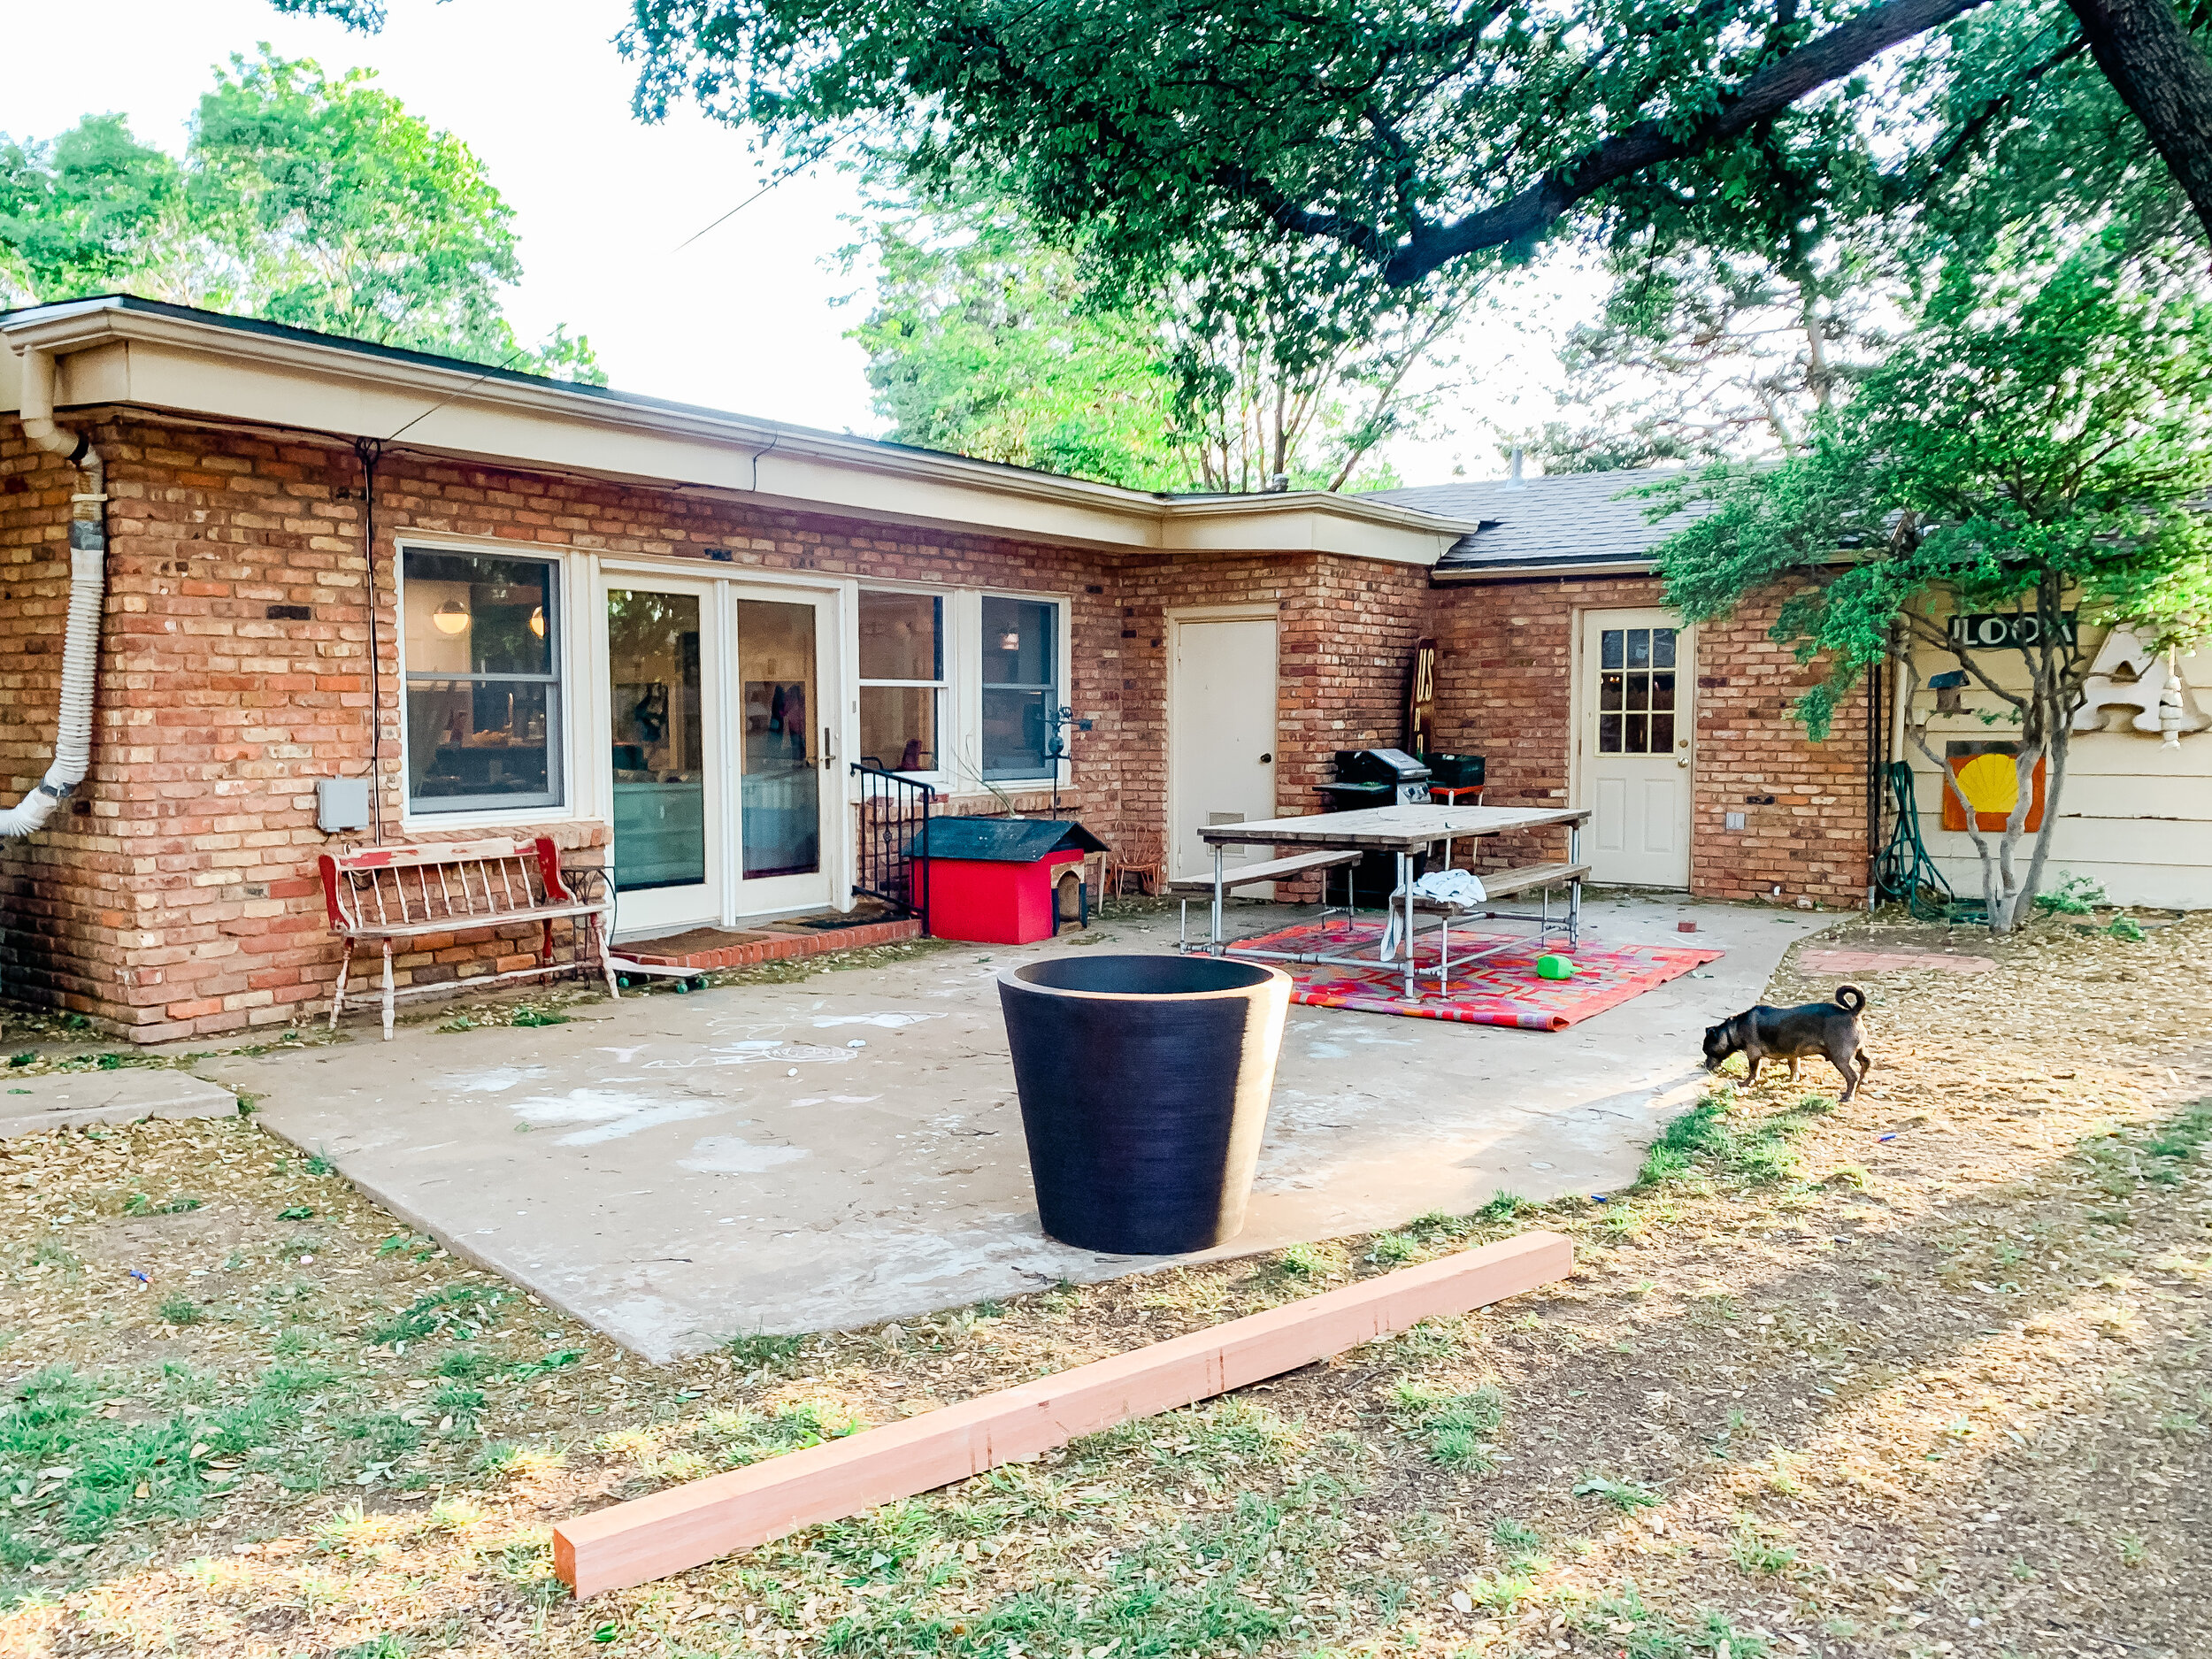
We’ve officially been in out new house for a year now and have been excited to work on some outdoor projects now that the weather is warming up. Our backyard patio area has a concrete slab, but that’s pretty much it. We’ve known we wanted to get a pergola eventually, and have even gotten a few quotes for one, but with the cost of lumber sky-high and other renovations taking priority, we opted for a much less expensive quick fix.


IMG_3052.JPG

Materials Needed:

  • Shade Sail- we bought ours on Amazon and got a 14x20 size. There are a ton of sizes and colors available. Tip: be sure you remember that there will need to be some space between the shade sail and your anchor points to properly create tension and keep the shade taut. Otherwise, it will be drapey.

  • Outdoor String Lights- these are the ones we got and we love them! They are plastic bulbs but look like glass.

  • Large (and I mean LARGE) planter- we bought ours at At Home and it is probably 2’ tall and 1.5’ at the base.

  • Quickcrete Concrete- we bought 4 bags

  • 4x4 8’ Cedar Post

  • 4 1/4” Eye Hooks for anchoring the sail to the house/tree/post (hardware store)

  • Coated cable up to 1/8” and cable fasteners- we needed these on a couple of sides where the anchor point was farther away (hardware store)

  • Carabiners to easily connect/take down sail at anchor points (hardware store)

  • Tension hooks to adjust tension on sail- you need at least 2- these we bought on Amazon

After we gathered all our materials, we got started on the planter post. First we centered the 4x4 in the middle of the pot, and while I held it sturdy, Shawn mixed the concrete around it. It didn’t take long at all for the concrete to set. We let it dry overnight.

IMG_3059.JPG

After the concrete was dry, we tested the post with a lot of pushing and tilting to be sure we didn’t need to add another layer of concrete. We ended up throwing in some extra bricks we had just to add some weight and drainage for the flowers I would be planting in the pot.
Then, it was time to start hanging the sun shade. This involved a lot of troubleshooting thought about where the exact anchor points needed to be. We ended up drilling 2 eye hooks into the brick of the home, one into the planter post, and one into a large tree probably 15 feet away from the patio area that was at a better angle than the original tree we’d envisioned using. Shawn set an anchor point about 15’ up in the tree so that the cable actually goes over the roof of our home and won’t interfere with anything.

We used carabiners to attach the sail so that in the case of very strong wind we could quickly take the sail down- and we plan to take it down in the winter as well.

partofmeblog.com.png

Once everything was attached, we used the 2 tension hooks to tighten the shade.

Then, it was time to hang the lights. I’d initially thought I would put them in an x shape underneath the sail, but they hung too low for my liking, so I ended up hanging them in a box shape. Since they are made for outdoor, I wasn’t too worried about weather on them.
It was finally time to pot some plants in the planter. I drilled 6 drainage holes about 1/2 way down the pot and then filled the pot with potting soil and added plants. I am glad we added the bricks because they will soak up excess water as well, while also allowing for drainage.

And that was it! We are loving our new shade sail and I can’t wait to work on some seating/decor for the rest of the patio area!

I wish I’d done a better job taking photos of the process, but it went so quickly I forgot! Here is a semi-put-together recap of my Instagram stories about it for all you visual learners like me!

#anglinabode Kitchen Reveal

AnglinAbode, HOME, HOME + LIFESTYLElissa-anglinComment
AnglinAbodeKitchen-1323.jpg

I am SO excited to show you this before + after. This kitchen remodel was the top priority for us in this home- and the first project we tackled. I’d better show you what we were working with when we bought this home first.

The kitchen is behind this beige wall- you can see the fridge and top of the faucet from here. Unfortunately, the kitchen had already been renovated in recent years- but was just not my taste at all, and though there was an attempt to open up the space, it still felt very dark and closed in.

320822ndSt-8855.jpg
320822ndSt-8861.jpg

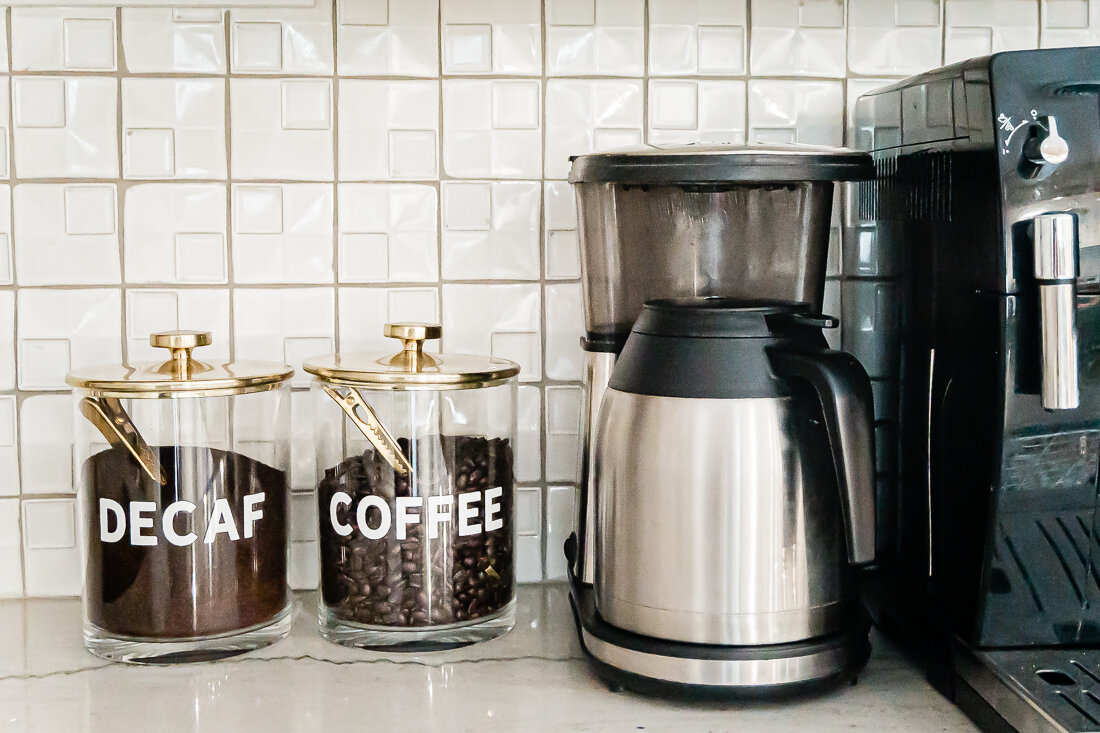
You can see here how the kitchen opened up into the back living space- but again, it just felt really dark and I felt it had the potential to function a lot better for our family with some reconfiguration. In the photo below, the far corner that has an air vent is where the coffee bar is now. Check out this post to see all the details on the coffee bar!

320822ndSt-8869.jpg

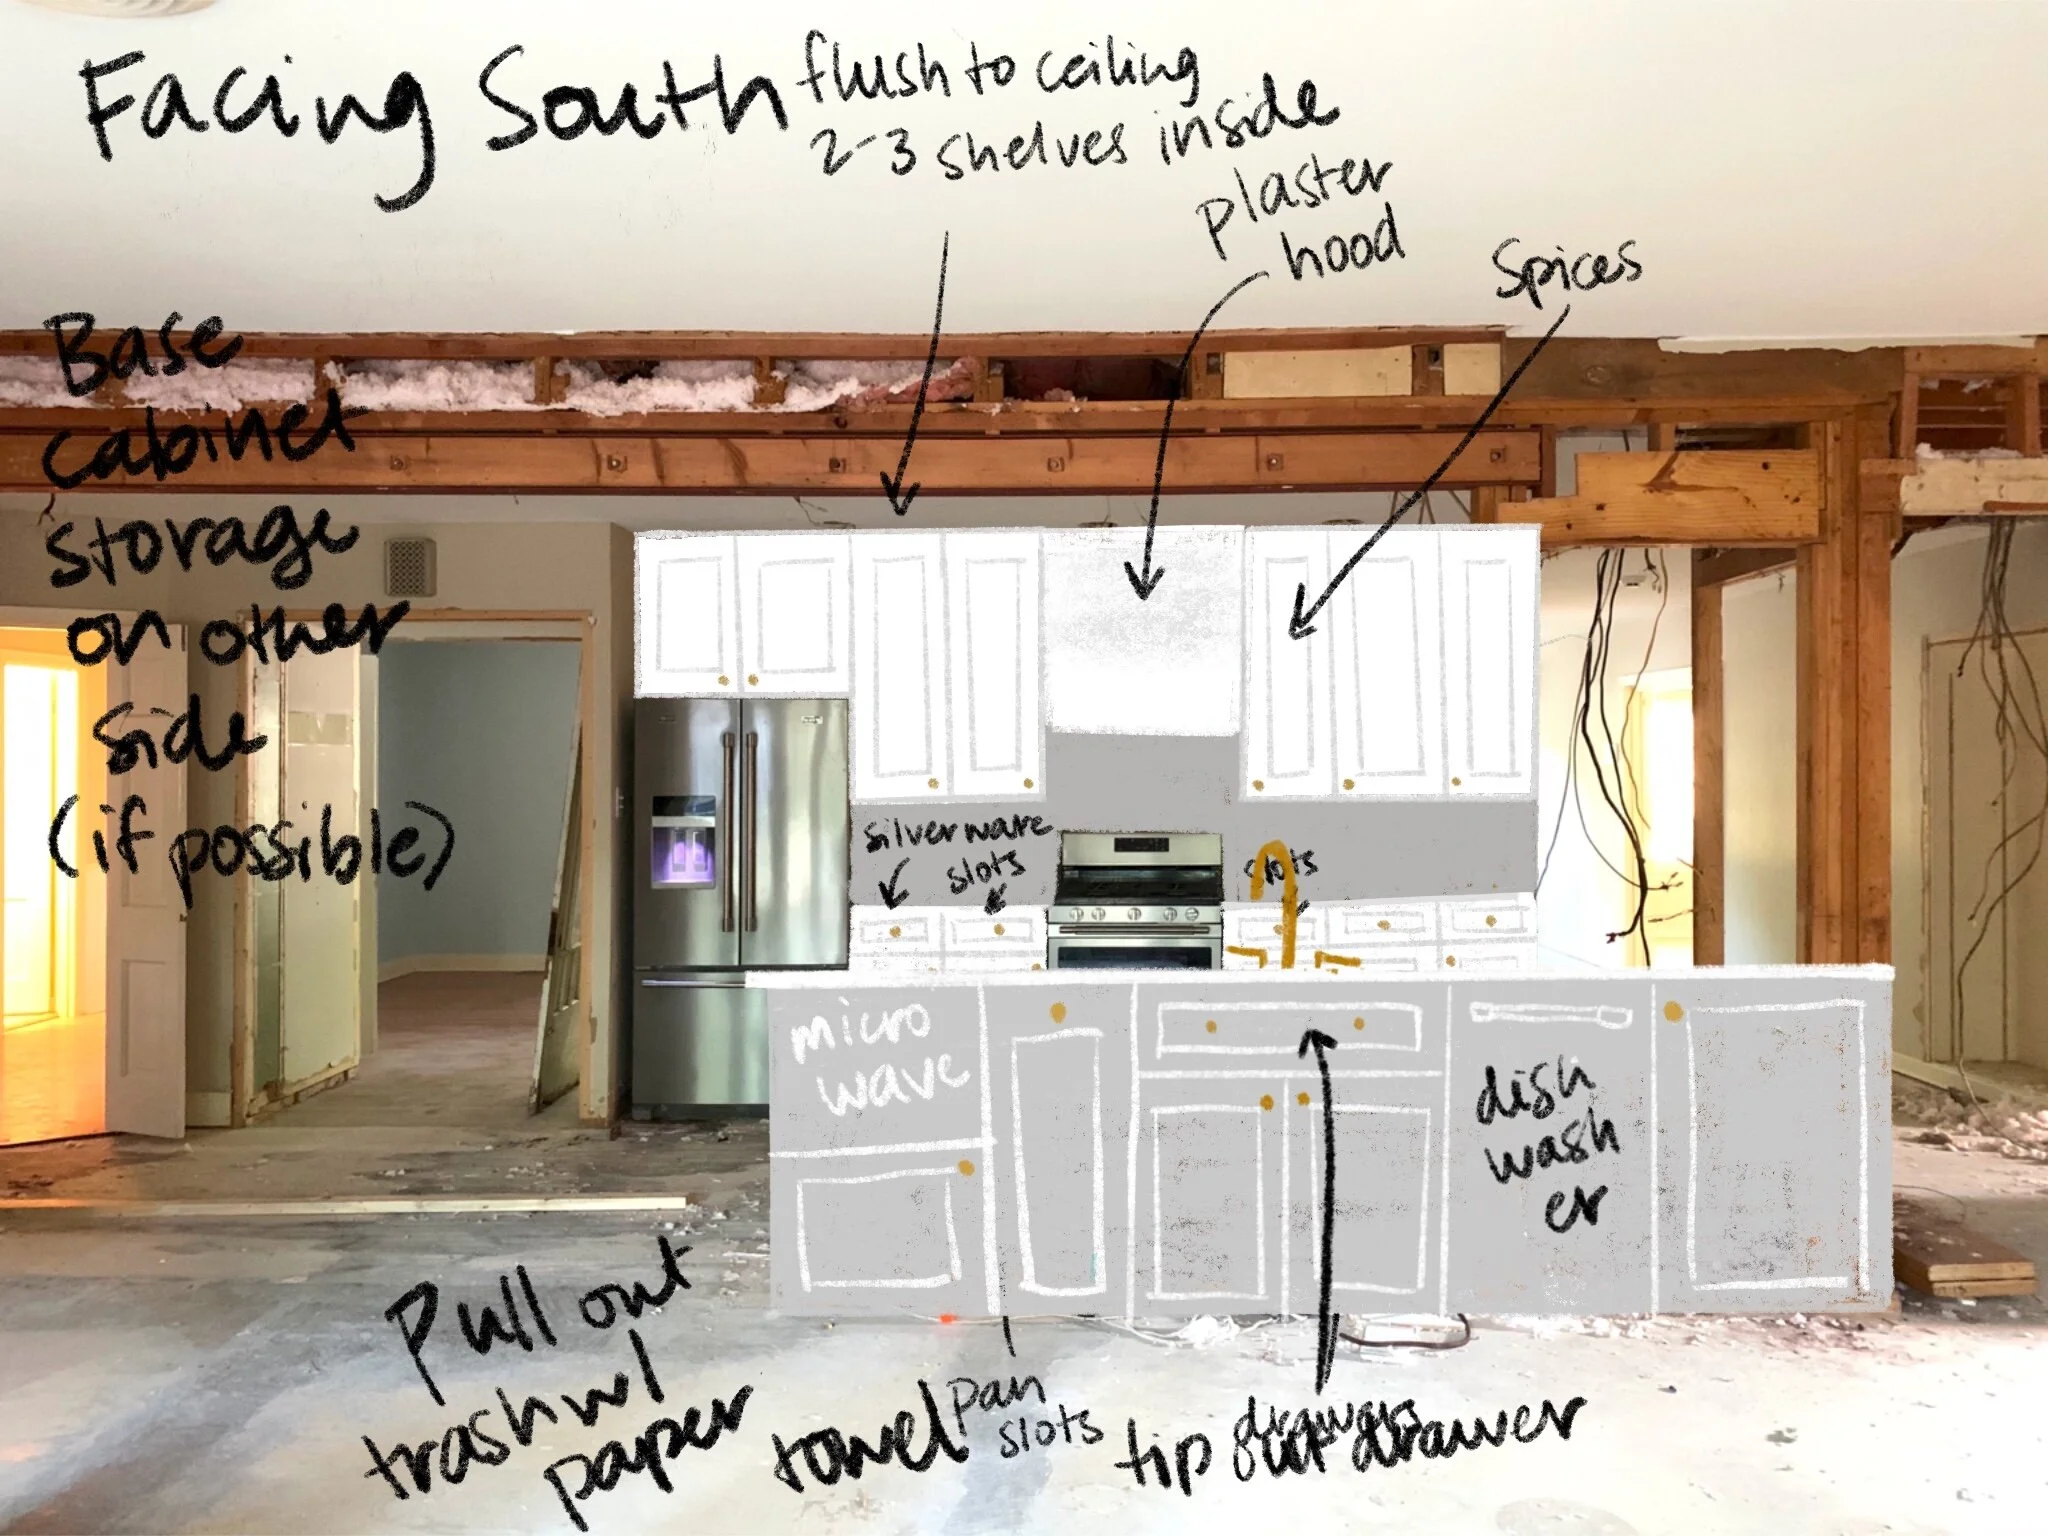
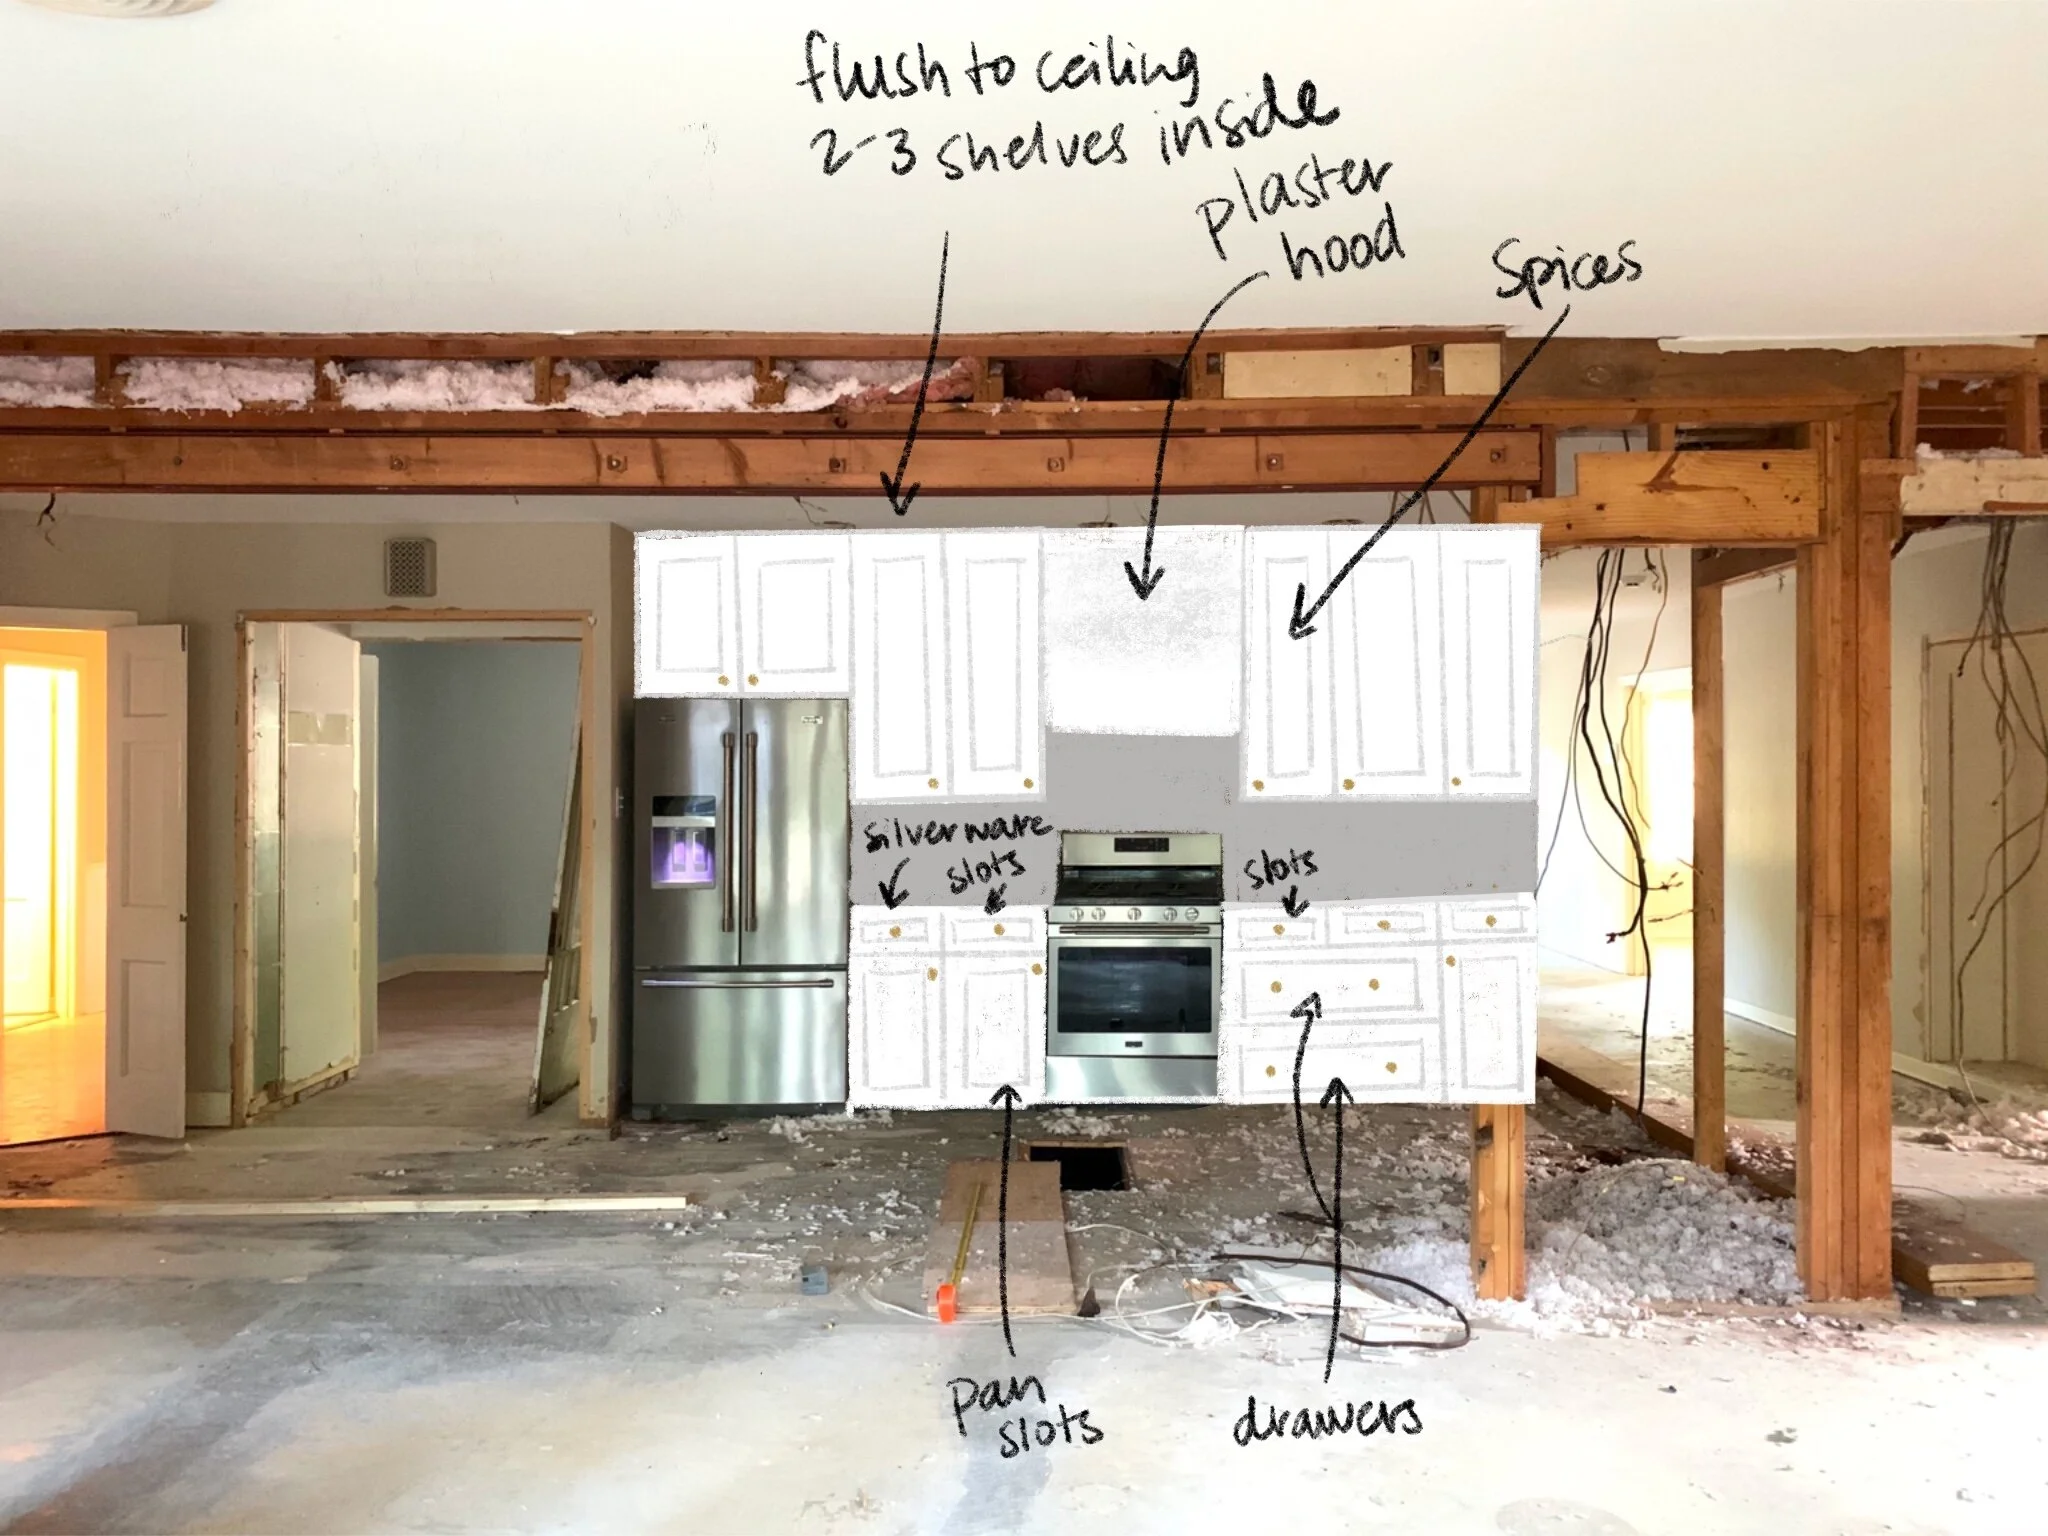
Here’s my sketch of the kitchen after demo. You can see that the beams had yet to be installed and the pantry (to the left) has been opened to make it larger- more on the pantry here!

In this sketch the kitchen island is flipped the wrong way so you can see the side that actually faces the oven. I hadn’t decided if I wanted to do a color on the island yet, or leave it white. Also, you can see I switched from knobs to pulls.

Untitled_Artwork 3.jpg

And now for the reveal!

I really love how it turned out. For this project, we had to put in two beams, since the parts of the kitchen I wanted to open up were structural. I was worried that it wouldn’t be able to happen, and it would have been such a disappointment had we not been able to open it up completely- BUT our contractors got it done!

Opening up the kitchen to the hallway and the back living space made it a much more functional space for our whole family and we spend most of our time in this area.

AnglinAbodeKitchen-1081.jpg

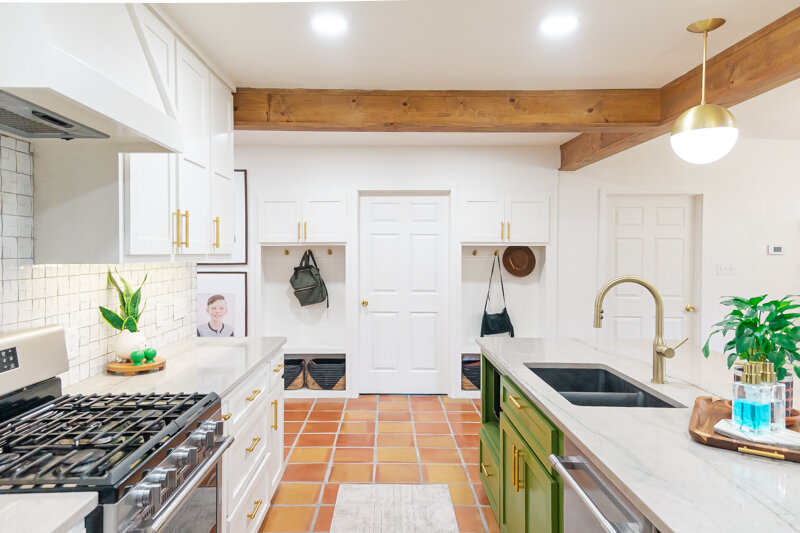
I love, love, love my green island. Once I knew we’d be doing saltillo tile throughout this space, I wanted to counter all those orangey-reds with something complimentary but still natural feeling. This color is Relentless Olive from Sherwin Williams, and I have never identified with a paint color name more in my life. :)

AnglinAbodeKitchen-1115.jpg

The white color throughout our home is Pure White from Sherwin Williams. I have been so thankful that I chose to paint trim, walls, ceilings, and baseboards all the same color- it has made the painting process so much easier for me and everything is cohesive.

AnglinAbodeKitchen-1139.jpg

Here is a before photo of the main hallway- to the left is where the laundry room door and cubbies are now, and to the right is the kitchen and island. You can see we lost a lot of great built-ins, but the functionality and flow we gained was worth it.

320822ndSt-8845.jpg

Here is my design sketch for the cubbies- I eventually decided to leave the bottom section open so I could fit whatever baskets I wanted. This doorway was also previously just a wall between shelving- we created a doorway here and moved the laundry room to this area.

Untitled_Artwork.jpg

I love that these cubbies have storage as well as hooks for backpacks, jackets, etc. Their location in the house is really nice too, because they are an easy spot to unload as you come inside- our front door is just opposite the shelf with greenery in the photo below.

AnglinAbodeKitchen-1167.jpg

A few notes on design choices here:

  • This home immediately gave me a spanish/mission feel and I felt like I could make that work seeing that we are in West Texas- and so I wanted to keep the textures and tones warm and cozy without it feeling too cramped.

  • My mid-century loving heart also needed some gold hardware and white walls- plus some Atomic Ranch vibes. So, the globe-shaped pendants and sconces over the island and coffee bar- plus the chandelier over the coffee bar that includes globes really satisfied that for me.

  • I really debated on the backsplash tile- and initially thought I would just go with white subway- but when I went to sample it, the white tones were just completely off- our paint choice being a warmer white made the subway tile look cold and hospital-like, so I kept looking. Finally- I found some interesting geometric tile on clearance at Lowe’s- and it was perfect. I would have never guessed I would go with it, but for us it has been subtle with some uniqueness- and because it is dimensional I have enjoyed the way the light plays off of it throughout the day. Unfortunately, because it was on clearance, we almost didn’t have enough to finish the job! We ran out of tile 3/4 of the way through and finally located a few more boxes in the Dallas area, where my sister picked them up and saved the day!

CoffeeBar-6026.jpg
AnglinAbodeKitchen-1351.jpg
  • One of the huge perks of this home (and one of the things that convinced Shawn it was s good buy) was that all the appliances were basically brand new- like still had the warranty stickers on them new. So, we didn’t have to spend anything on appliances, with the exception of the fridge drawers and ice machine in the coffee bar. This was a huge savings for us.

  • I chose a black sink in the main island and the coffee bar and I have loved that choice. Not only does it hide stains well, it is super durable and I love the contrast. I’ll link everything below!

  • Our countertop is Macaubus Quartzite- and is probably my favorite thing in our kitchen. I knew I wanted something that had a lot of veining and movement, but marble made me nervous and quartz didn’t have the natural feel I was looking for. So, when we visited the stone yard, our friend who owns the place educated us on the different types of stones and found this slab for us. It is overall a light grey with some subtle green, blue, orange and purple tones. The green of the island really picks up the veining, which I think looks like a heartbeat line in some places. I absolutely love it.

AnglinAbodeKitchen-1231.jpg
AnglinAbodeKitchen-1267.jpg
AnglinAbodeKitchen-1158.jpg

I hope you enjoyed my tour! I’ll list links to everything I can link below!

White Paint Color: Pure White by Sherwin Williams. Our trim, cabinets and walls are all this color and it has made painting the whole house (my primary job in this reno) SO much easier!

Tile: Saltillo (terracotta) tile from Yates

Countertop: Macaubaus Quartzite purchased from Stone King in Lubbock

Contractor: Re-Purpose Construction

Everything else linked below!

Anglin Abode Reveal: Pantry Organization with my sidekick Cricut Joy

AnglinAbode, CRAFTS, DIYlissa-anglinComment

This post has been sponsored by Cricut, who has enabled me to create the custom pantry of my dreams!


I never would have guessed that one of the first “reveals” I’d share of our new home would be the pantry- but here we are! And it really makes sense- with a family of 5- I had no other choice than to attack the pantry and get it in order before chaos ensued. I ended up finding some really cool organizational items and creating some custom labels in a pinch with my Cricut Joy (tutorial below!).

Let’s take a quick second to remember the pantry (or lack thereof) that our house had when we first bought it:

320822ndSt-8861.jpg

See those white sliding doors to the left of the fridge? That was the “pantry”. It was nice and wide, but only about 6 inches deep. I’m not kidding- 6 INCHES deep. Basically pointless.

Thankfully, the room directly behind the pantry had a closet that wasn’t super necessary- so I chose to bust through the wall and create a larger pantry. I also wanted to add a bit of character with the new pantry door, so I found a great antique door at Jux Ta Posh (one of my favorite shops here in Lubbock!) and stripped it so you could see the original wood. It turned out to be quite a project and my Dad and Shawn even had to jump in- but I’m so pleased with the results!

E7436BBE-9DE0-45A1-BEBF-A51D8BEF70F6.jpg

Here’s how it turned out- quite different, right? I don’t typically keep the light on when the door’s closed. :)

DSC_2469.jpg

Anyway, because of all the new space, it was high time to get ORGANIZED. I was really thankful to have had time to think about how I wanted to place everything- what needed to be accessible for my kids, things I grab for cooking frequently, pain points from our last home’s pantry.

I ended up finding quite a few great products for the job- they have been total game-changers in keeping the area looking tidy- especially now that it’s somewhat visible.

DSC_2403.jpg

Here are a few things that were really helpful with organization:

Gold Wire Baskets - used here for baking supplies

Clear Plastic Canisters - for rice, beans, flour, sugar, etc.

Clear Tall-Sided Lazy Susans - I splurged for these tall-sided ones and am SO glad I did. Things don’t fall over/out of these and they are sturdy and spin well even with heavy glass bottles in them

Large Stacking Bins - for chips, cereal, anything large and bagged. I have LOVED these because they keep everything from falling over or on the floor. (These are out of stock at the time of this post 😫which breaks my heart because they are one of my favorite things! But, I’m linking some similar ones here.)

DSC_2409.jpg

I also wanted to make the most of the space at the bottom of the pantry- and was happy to find a couple of shelving units that fit perfectly, along with a stool that easily folds and tucks away right inside the door.

White Shelves - these are actually shoe racks but work perfectly for the bottom of the pantry!

Foldable Step Stool - I will probably be buying more of these, haha- we all use this constantly.


To create the labels for everything, I used my Cricut Joy and the mobile app. It was super simple and I filmed a short tutorial on how to do it below. One of my favorite things about the Joy is that it is so portable- so I literally set it up in my kitchen and cut everything straight from the app on my phone.

If you’ve never used the Cricut Mobile App before, don’t be intimidated- it is super intuitive and basically just like Design Space on the computer. Feel free to check out my tutorial below- but here are the basic steps:

Tools needed for this project:

Cricut Joy

Cricut Joy Design Space mobile app (free)

Weeder and Scraper

Joy Smart Vinyl - Permanent in the 2 colors of your choice

Cricut Transfer Tape

Scissors

IMG_9517.jpg
DSC_2397.jpg
  1. Measure the spaces where you’ll put your labels. My canisters had the smallest available label space at about 1x3 inches, so I decided to make all the labels that size.

  2. Create the black boxes using the shape tool. I made mine 1x3 inches, duplicated them, and cut them out on the Joy.

  3. Type out your words in Design Space and ensure they are all sized to fit within the boxes you’ve cut. I used Market Street Fonts- Eloise in all caps for this project. Cut them out on the Joy.

  4. Weed your words and use Cricut Transfer tape to place the words on the boxes. Labels are done!

  5. Stick your labels on your stuff. Done!

CricutLabelPantryPinterest1.png

This post contains affiliate links, on which I will receive a small commission should you purchase anything/sign up/subscribe etc. I would never share something I didn’t actually like or want to share with you, so I wanted to let you know. Sharing affiliate links affords me a few more lattes and it’s always my aim to add value to your life with the brands and products I share. Thanks for supporting me!

Terracotta Floor Vase DIY (on the cheap!)

CRAFTS, DIY, AnglinAbodelissa-anglinComment

Well friends, we have officially finished the renovation process of our home- I really had great intentions to share more of the in-between process, but now I think it’s best I go room-by-room so that I can show you the full transformation in each space.

That being said, as I work on getting everything styled/decorated, I have been working on some fun little side projects, like this one!

terracottafloorvase.png

If you’ve been on the internet for half a second lately, you will have seen the HUGE pampas grass trend that’s happening right now (here you go just in case you don’t believe me)- which is super handy for those of us living in West Texas, because it grows really well here. In fact, my parents happen to have some in their backyard.

So, I asked my mom to bring me some to use on our fireplace mantel. Little did I know that they would literally be 5 feet tall and waaaayyyyy too big to put in the tiny vase on our mantel I’d planned. So I decided to just put them in a floor vase on the ground. Problem was- I had no floor vase, and barely any budget to go out and buy one.

That’s when I found myself hanging out in the air ventilation section of Lowe’s looking like a crazy person to the many contractors who came and went while I pondered. But guess what, ya’ll? I DID IT. I made a vase, and it only cost me $15.

This project was definitely more of an experiment than an actual “project”. I had seen the terracotta paint trend on Tiktok and thought this would be a fun opportunity to try it out. Warning: THIS IS A MESSY, IMPERFECT PROJECT. If you are a perfectionist, maybe just save up your dollars and buy yourself a vase. But if not, read below to see how it turned out!

Here’s a quick little video if you want a sneak peek of the process:


What you’ll need:

  • Galvanized Steel Round Duct Pipe found in the HVAC section at the home improvement store

    • I used a 6”x24” one ($7), but you could use any size- they have larger ones

  • Galvanized Steel Round End Cap (also in the HVAC section)

    • You will want to be sure you get the same width as your pipe- in this case 6” wide

    • This cost around $6

  • Plaster of Paris (found in the paint section, but I already had some at home)

  • Medium to coarse grit sandpaper- I used 60 grit I had at home

  • Vinegar

  • Water

  • Duct Tape

  • Wide Paintbrush

  • Acrylic paint (I used brown, red, black and yellow to create a terracotta color)

  • Polycrylic Satin Finish (not necessary but recommended)

IMG_8918.jpg

Step 1: Build the vase

This is pretty self-explanatory: the pipe has a snap-lock design that literally just pops into place. Might want to wear some work gloves while doing this, though- those edges can be sharp!

Once the tube is made, insert the end cap. It should fit perfectly on the plain end of the tube (not the side with the waves).

Step 2: Prep for paint

I used the duct tape to cover the top end of the vase- so that it had a rounder edge and I wouldn’t be cutting myself while working with it. I used several pieces and just folded it hot dog style over the lip.

Next, you’ll want to wipe the outer surface with vinegar. Just wipe and let it set. And then sand your little heart out. The galvanized steel has a chemical layer on it that keeps it from rusting, and that needs to come off in order for the paint to adhere. The vinegar helps it break down, and the sandpaper takes it off.

Sand everything for as long as you can. The rougher the surface, the better your paint will adhere- and even sand the duct tape a little. It will be fine, I promise.

Step 3: Paint

So there are many different recipes for terracotta-style paint- but I chose to use Plaster of Paris because 1. I already had some at the house and 2. I like working with it. It’s water soluble and pretty forgiving.

To mix your paint, you’ll dump a cup or so of the plaster of paris into a bowl, add your paint (I did generous squirts of brown, a little red, and a little yellow), and then around a 1/2 c of water. Use a popsicle stick (or some other hard tool) to mix. You want your mixture to be spreadable, but hold it’s shape- I would say a thick milkshake texture. If it’s too thick, add a bit of water. If it’s too thin, add a bit of plaster.

For more of a visual on mixing the paint, check out my short video above.

1st coat finished and dry! As you can see, the plaster mixture is much darker when wet.

1st coat finished and dry! As you can see, the plaster mixture is much darker when wet.

Also remember that because the plaster is white it will naturally make your mixture lighter. It will also dry significantly lighter than it is when wet. I did a few test colors on the protective cardboard I was working on to check color before I actually started painting the vase. To do this, just wipe a bit of the paint/plaster mixture on a surface and use a blow dryer to dry it. It should lighten considerably and give you a realistic color representation.

You will need to work relatively quickly, because your plaster will harden and create chunks in your mixture. If you’re into the texture, go with it. If you’re not— don’t say I didn’t warn you. :)

Turn the vase upside down and start painting. Your first layer will be thin and you’ll likely be able to see the metal through it in places. Be sure the bottom is completely dry before flipping it over to paint the top lip. I also painted the top 3-4 inches of the inside. The plaster is very fragile as it dries and so it will chip off if you’re not super careful when you’re moving the vase around.

Here you can see the texture of the plaster and the inside of the vase with only 1 coat.

Here you can see the texture of the plaster and the inside of the vase with only 1 coat.

Once you have 1 coat, cover your plaster mixture (if you don’t, it will dry and chunks will form!) until you are ready for the 2nd coat.

Repeat the process with 2 more coats. The texture should build considerably, and the pattern/seams in the metal should disappear under the plaster. If you feel the vase is getting too texture-y, don’t worry- once it’s dry, you can lightly sand it with sandpaper and it will smooth out.

I paid special attention to the tip rim of the vase once I was finishing up- making sure there was enough thickness there with the plaster.

Step 4: Paint Details (Optional)

Once the plaster was completely dry, I decided to add some detail to make it look more pottery-ish. To be honest, I’m still not sure if I like it, but I’m going to let it hang out by my fireplace for a while to see if it grows on me.

To paint the detail, I just thinned out some white acrylic paint and used a round brush. I wanted the detail to be a little transparent, and this did the trick. If your paint is too thin and it drips, it’s pretty easy to wipe off with a damp paper towel.

The finished product!

The finished product!

Step 5: Topcoat

This step could also be optional if you are super in love with the matte look and don’t want to change it in any way. However, I will say that the Polycrylic Satin is quite matte when dry and will actually make the vase more sturdy and strengthen the plaster/paint mix- so I highly suggest it.


If you give this project a shot, be sure to share your results with me by tagging me @lissaanglin on social! I’d love to see if I could find some type of cardboard tube to also try with this plaster-paint treatment.

Come say hi on Instagram!

demo time!

AnglinAbode, HOMElissa-anglinComment

Demo on our house started just a couple of days after we closed, and if you read my previous blog post, you’ll know I was DYING TO SEE what laid beneath those two walls in the kitchen I wanted to take out.

If they were structural walls, it meant we’d need to add a big beam and pay all the dollars for it. If not, no beam and fewer dollars.

Well low and behold, we arrived shortly after closing to see this:

IMG_3262.jpg

It was, unfortunately, load-bearing. And the wall removal also revealed that there had been at least 2 other renovations on this poor home.

The built-in shelves which many people loved when I gave a tour on Insta were the first to go (sorry!).

Once we faced the music about having to put in a giant beam (and how much that would cost), demo continued.

IMG_3266.jpg

The front bedroom floors were ripped up to reveal plywood. This room will get new hardwoods.

IMG_4650.jpg

The ugly brown hallway tile was removed and so were the other shelves in the hallway that will eventually become the mudroom cubbies.

One day we pulled up and this was sitting in our driveway:

IMG_4117.jpg

Which only means one thing: beam time!

Here’s the before with all the walls/cabinetry removed:

IMG_4110.jpg
IMG_4111.jpg

And then in an afternoon, it was done!

IMG_4123.jpg
You can see here that they actually had to install 2 beams, as these 2 walls were originally exterior walls of the home.

You can see here that they actually had to install 2 beams, as these 2 walls were originally exterior walls of the home.

You can see that it really opened up the area!

You can see that it really opened up the area!

Below is the new laundry room- former sitting area off the master. The door in the back is our master closet. Master bedroom is to the right, and we sheetrocked over another door that went into the front bedroom closet, so I can build storage there later. The mudroom cubbies will be on either side of the door (currently open).

IMG_4475.jpg
Here is the door we closed up. There was really no reason for it to be there, and it will allow me some extra storage space on both sides.

Here is the door we closed up. There was really no reason for it to be there, and it will allow me some extra storage space on both sides.

Here is the new pantry with the old door I refinished for the entry into the pantry. I wanted something old/rustic as everything else will be new, and they are going to frame it out in the center of the pantry.

IMG_4477.jpg

A great surprise- they discovered original hardwoods in our master bedroom! We were super excited about this but they are an inch or two lower than the other floors that lead into that room, so I’m interested to see how that works out.

IMG_4470.jpg

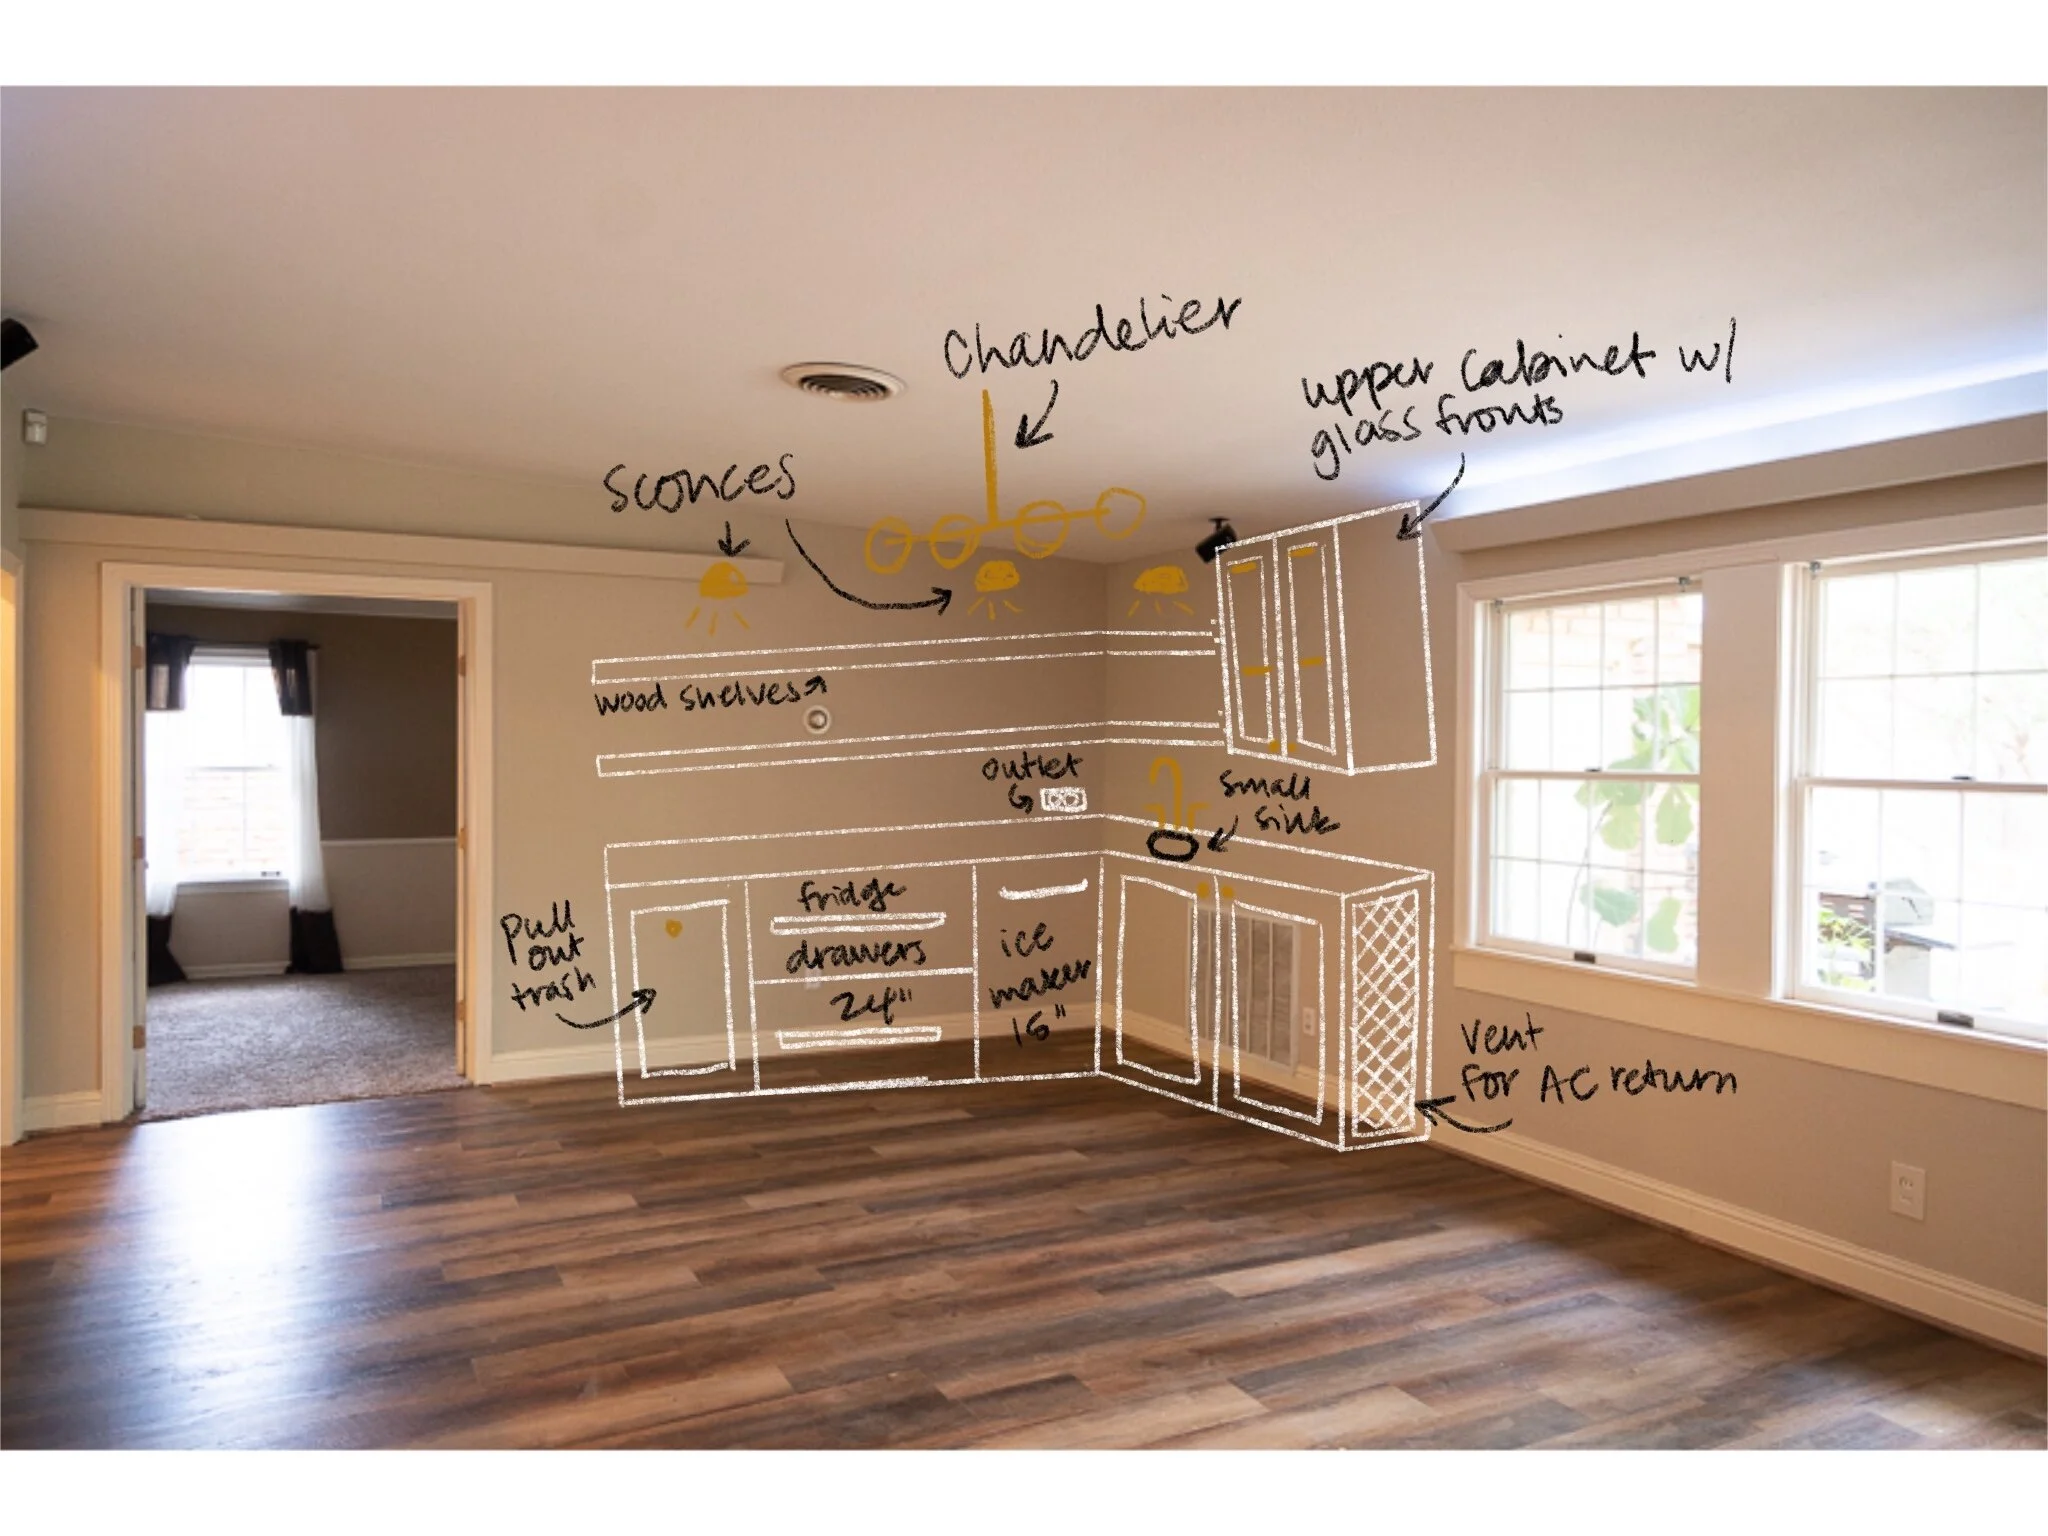
This will be where the beverage bar is going. You can see they are working on the electrical here- they also had to add plumbing for the sink and ice maker. Another challenge is that I wanted base cabinets literally right over that huge AC vent. Thankfully, our cabinet maker is going to build it into the cabinets so we don’t have to relocate it and it can still be functional (and less of an eyesore).

IMG_4651.jpg

Hope you enjoyed seeing our bare naked home! Haha! Already walls are getting put back together so stay tuned for more updates soon!

initial design sketches for the Anglin Abode

AnglinAbode, HOME, HOME + LIFESTYLElissa-anglinComment

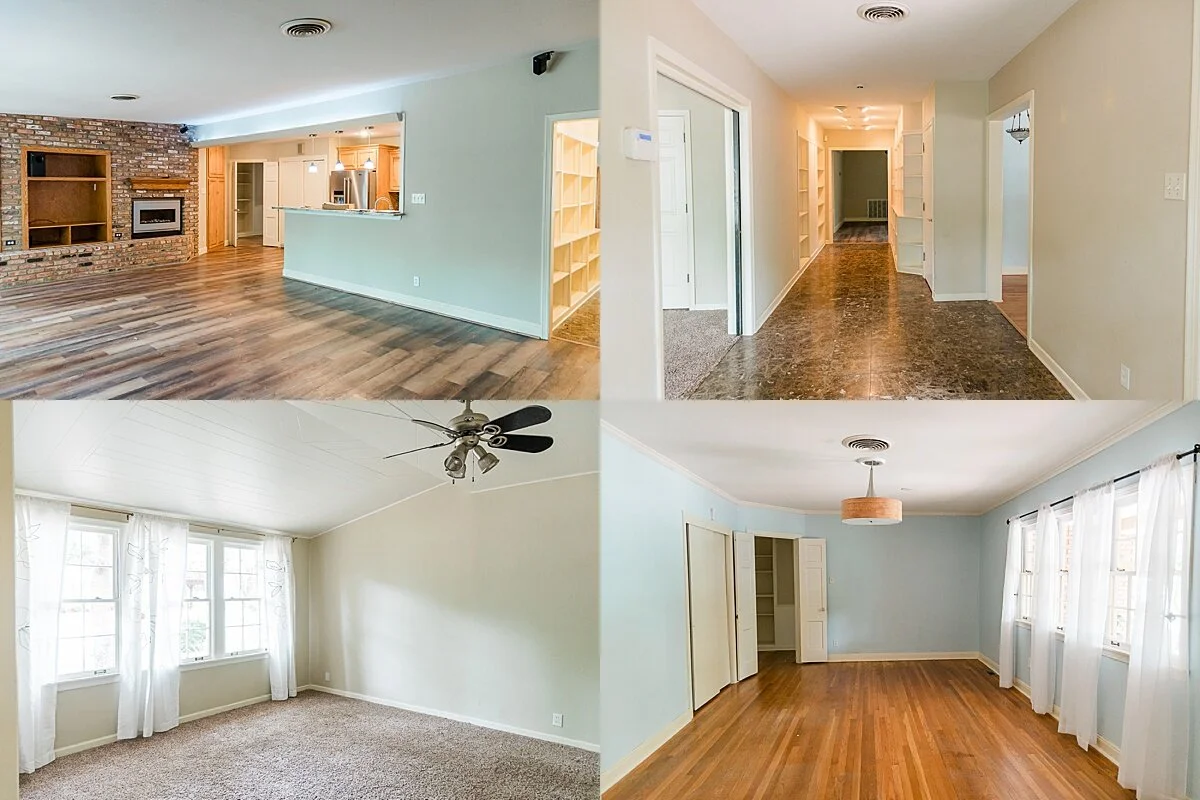
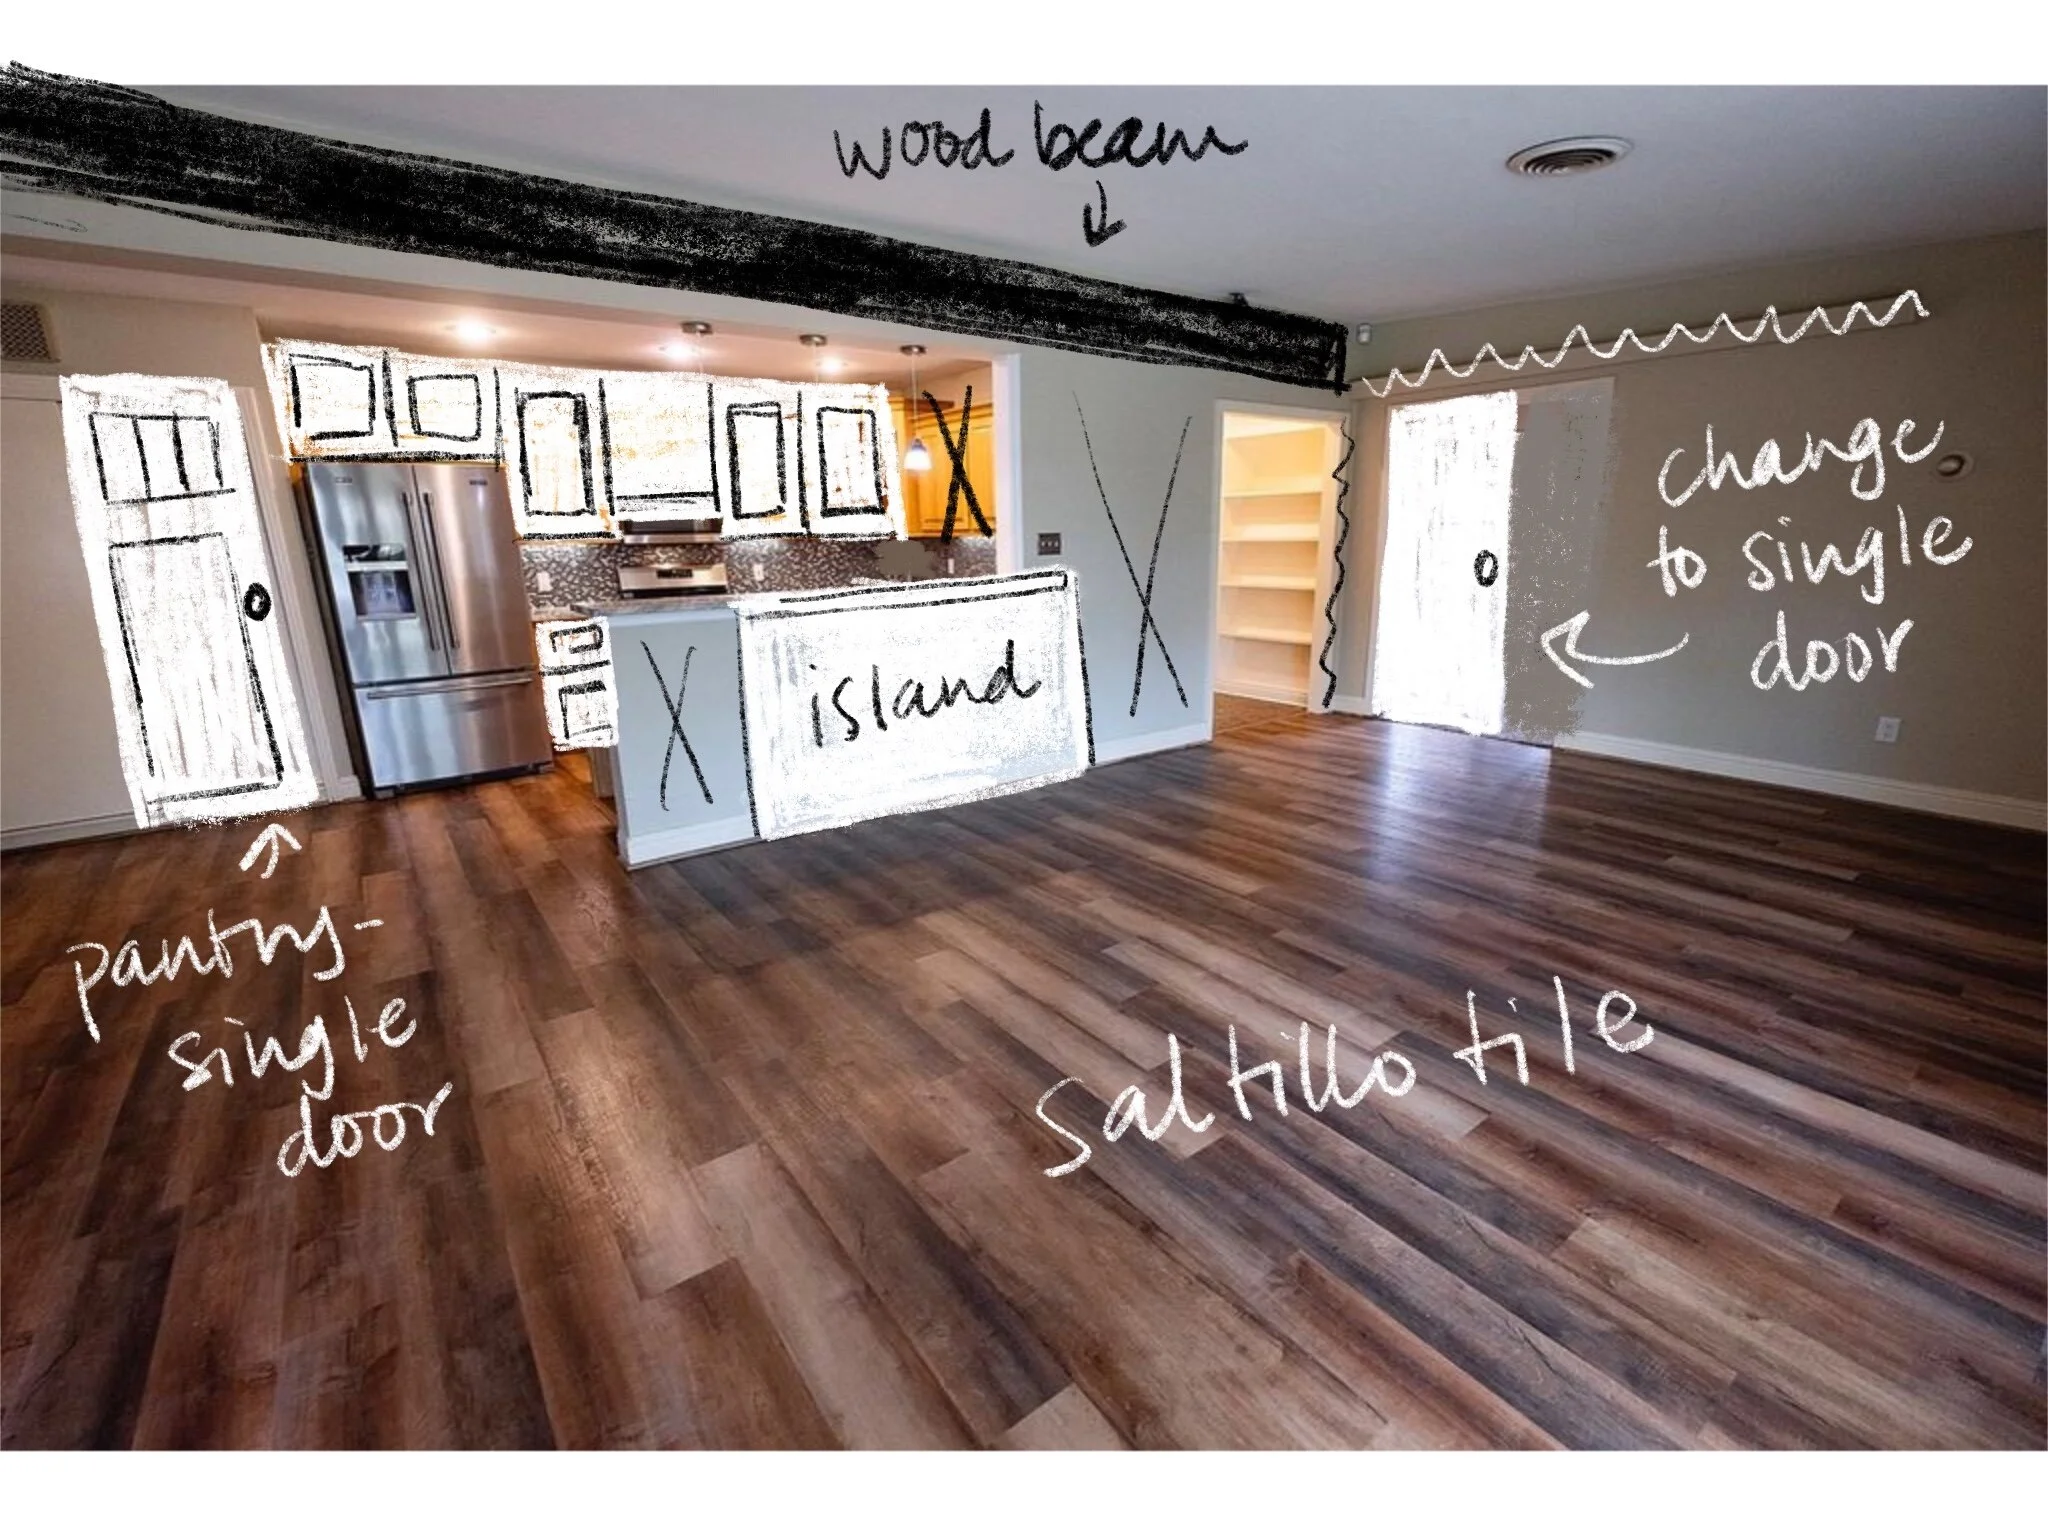
I’m excited to share my initial design sketches with you for the #anglinabode! These are the initial sketches I handed our contractor. I literally just drew them up over the listing photos and was like, “can you make this happen?!”. Haha, thankfully they have been great to work with and listened to all of my design concerns.

I mentioned in my first post about our new home that the first time we walked through it I was like


But then once I went home and had some time to really think about the layout, what I liked and hated about the house, a vision began to grow.

I started sketching and got really excited about the potential. Of course, everything was riding on the idea that we could renovate. Once I had a vision for the property, I couldn’t picture it working out for our family without the changes- and without the changes, I wasn’t interested in buying the home. So the reno was key. It had to happen.


Prepare yourselves, I’m feeling very GIFy today.

After talking it over with Shawn, we decided we’d want to re-do the kitchen and main living space, create a new laundry room, and re-do all the bathrooms. So yeah, pretty much the whole house- not to mention some exterior changes we’d like to make.

We decided to start with the kitchen, main living, and flooring and MOVE IN WITH MY PARENTS until those were done. Ya’ll, my parents might be the most patient and gracious people I know. We’ve been living with them for about a month now and I know they have earned some extra crowns in Heaven these past few weeks. :)


Let’s walk through some of the pain points and potential solutions:


LissaAnglin_PartofMeBlog_0077.jpg

Problem: SO MANY different types of flooring. There were original hardwoods in some of the rooms, carpet in others, and laminate flooring. Having so many different flooring types is a pet peeve of mine- and I don’t like carpet, either. In our last home, we ripped up all the carpet and installed laminate which made a huge difference.

Solution: Tile and refinishing the original hardwood, putting in new hardwood. Since I’m not a fan of carpet (rugs allll the way for me! Washable, replaceable, and hard flooring lasts way longer), I decided to do tile in the main entry hallway and kitchen/main living area, along with the new laundry room. 2 of the 4 bedrooms did not have the original hardwoods that the others did, so we planned to install matching hardwoods there. Flooring consistency achieved.

320822ndSt-8861.jpg

Problem: Kitchen was too closed off. The kitchen in this home had undergone a renovation not too many years ago, but it just wasn’t our style, and I didn’t feel it would function very well for us the way it was. Originally it must have been a closed in room, but had been opened up a bit to create a u-shaped layout with a bar. It wasn’t bad, but I really wanted to see it with a standalone island. So, I drew up this sketch:

IMG_0516.JPG
IMG_0517.JPG

Solution: Knock those walls down and create a 1-wall kitchen with an island. Here, we are getting rid of the wall that connects to the main hallway, and converting the current bar area into an island. This part of my plan was the thing I was most nervous about- we wouldn’t know whether this wall was load-bearing (which it likely was) until after we purchased the home. If it was, a beam would have to be put in and could be a large budget item.

I was pretty adamant on making the walls disappear so that the overall space would be a lot more functional and inviting for us, as we’d have more seating around a bar and the flow of the kitchen would work better. As it was, there was only room for 2 people, and 1 way in and out of the space.

Here’s a more updated sketch of the kitchen- in this sketch the island is flipped around so you can see the appliances- the side that is showing will actually be facing the kitchen wall. I’ve already changed my mind on a couple of things, so there will be tweaks.

IMG_0519.JPG
You can see the pantry here to the left of the fridge.

You can see the pantry here to the left of the fridge.

Problem: TINY pantry. Yall, this pantry space was wide, but only about 6 inches deep. It was laughable. There was NO way our family of 5 could contain all our snacks in there.

You can see the pantry already opened up to the closet behind it in this image.

You can see the pantry already opened up to the closet behind it in this image.

Solution: Open up the pantry to include the closet from the front room. The pantry solution was wonderfully easy- there was a closet right behind it that opened into the front living room. We decided to close it up and use that space to make the pantry larger. Yay!

The laundry room is located through the right door in this photo.

The laundry room is located through the right door in this photo.

Current laundry situation. That’s our Christmas tree, not a body bag, haha.

Current laundry situation. That’s our Christmas tree, not a body bag, haha.

Problem: Laundry area was inefficient. Ya’ll, I don’t love laundry, but I especially don’t love laundry if I feel like I am in exile while doing it. The placement of the laundry room had been moved a couple of times, it seemed, as this home has been added onto (we can count at least 3 renovations this poor home has already endured!), and currently, the laundry room was off the master bedroom. It had an exterior door- why? Who knows. No storage. Behind that door is the water heater. And to get to it, you have to go through the master bedroom. Plus, it took up space. If we moved it, we could DOUBLE the size of our master bathroom. Yes, please!

Current sitting area off the master- future laundry room!

Current sitting area off the master- future laundry room!

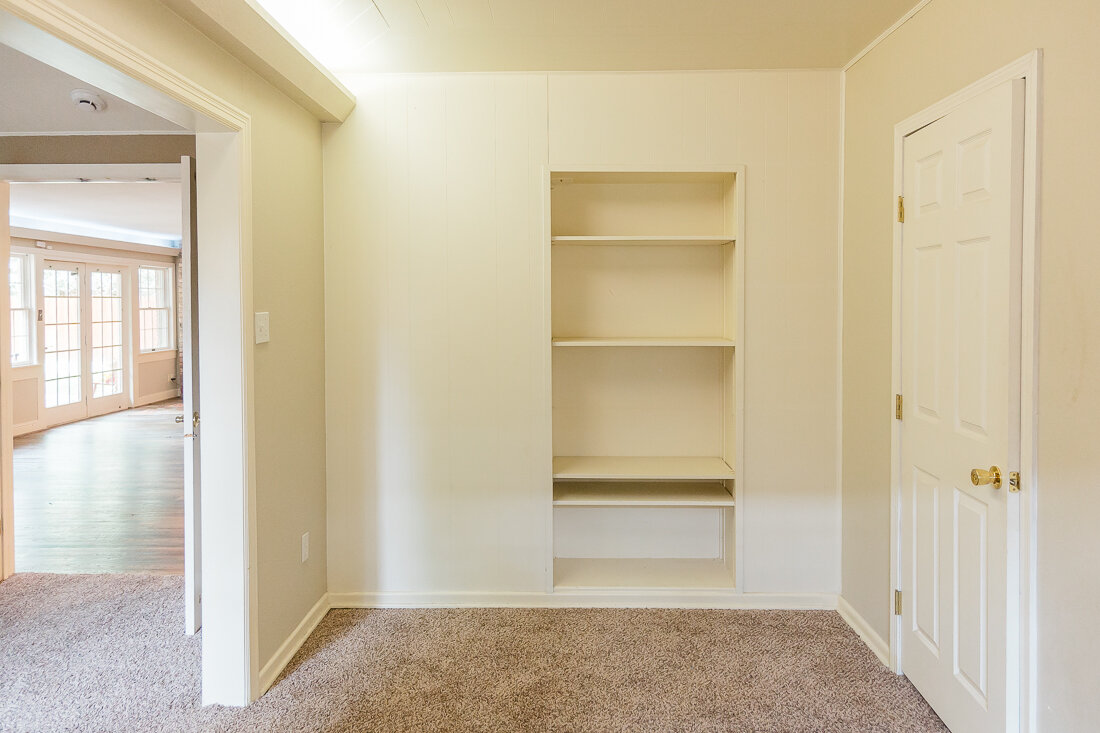
The other side of the new laundry room. This bookshelf will be made into a doorway that opens to the main hallway, so now you don’t have to go through the master to get there.

The other side of the new laundry room. This bookshelf will be made into a doorway that opens to the main hallway, so now you don’t have to go through the master to get there.

Solution: Move the laundry room. Am I crazy? Yes. Right off of the master bedroom, there was a little sitting area. Initially I imagined using it as space for a vanity or comfy chair- but then I realized it would be a perfect laundry room. If we were able to open it up to the hallway, it would be easily accessible but wouldn’t require a trip through my bedroom. And, it would be more centralized in the home. Plus, I’d be able to add storage and a sink. Having a sink in my laundry room is something I have always looked for- since I do so much painting and other creative projects, I like having a sink to wash out brushes, etc. that isn’t the same sink I do dishes in. A caveat to this is that our master closet is connected to this room, but not our master bedroom, so we’d have to also have a door to our master bedroom. I am excited about this, however, because I think it will actually make doing laundry easier since our closet is right off the laundry!

This area of our house which I am calling the main living area is actually an old patio that was enclosed. Because of that, there is no attic space here nor overhead lighting.

This area of our house which I am calling the main living area is actually an old patio that was enclosed. Because of that, there is no attic space here nor overhead lighting.

The old owners installed these very interesting light fixtures (you can see them over the windows and the door) that I couldn’t wait to see go. I also felt this back corner really needed something to define the space.

The old owners installed these very interesting light fixtures (you can see them over the windows and the door) that I couldn’t wait to see go. I also felt this back corner really needed something to define the space.

Problem: Lots of space with no function. I love a well-designed home, and if you don’t know by now, I care A LOT about the function of the home, as well as the visual style. So, in envisioning our main living area, I saw a lot of space without a lot of function. It was missing overhead lighting, and I wasn’t sure what the furniture configuration would look like.

IMG_0520.JPG

Solution: Add cabinets to create storage and define the space. Because we were losing some cabinet space when we opened up the kitchen, I thought it would be fun to add some cabinetry to the back corner of this main room. You see this corner upon entering the home, and it would help designate a dining space for the room. So our “beverage bar” was born! My sketch here includes L-shaped cabinets, open shelving, outlets for coffee makers, etc. and a small sink. We also got a little bougie and included a nugget ice maker and refrigerator drawers for sodas, beer, etc. I am really excited about this little area and hope it becomes an easy entertaining space for us and our kids. I plan to put our dining table in this corner.

320822ndSt-8845.jpg

Problem: No mudroom/inefficient shelving. When we first toured the home, I loved the built in shelving that was at the end of the main hallway. However, I didn’t love it as much as I loved the concept of a more open kitchen. In order to open up the kitchen we had to lose the shelves on the right side. The other side of shelving had one bookcase-style shelf, and one magazine-rack style shelf. I am sure I could have come up with a creative solution for those magazine racks- but I really wanted them to be more useful.

IMG_0521.JPG

Solution: Make them into storage/Mudroom type shelves! I designed 2 symmetrical areas on either side of the new laundry room door. They will have an enclosed cabinet up top, hooks in the middle, and cubbies for shoes in the bottom. So excited to see these come together!

320822ndSt-8875.jpg

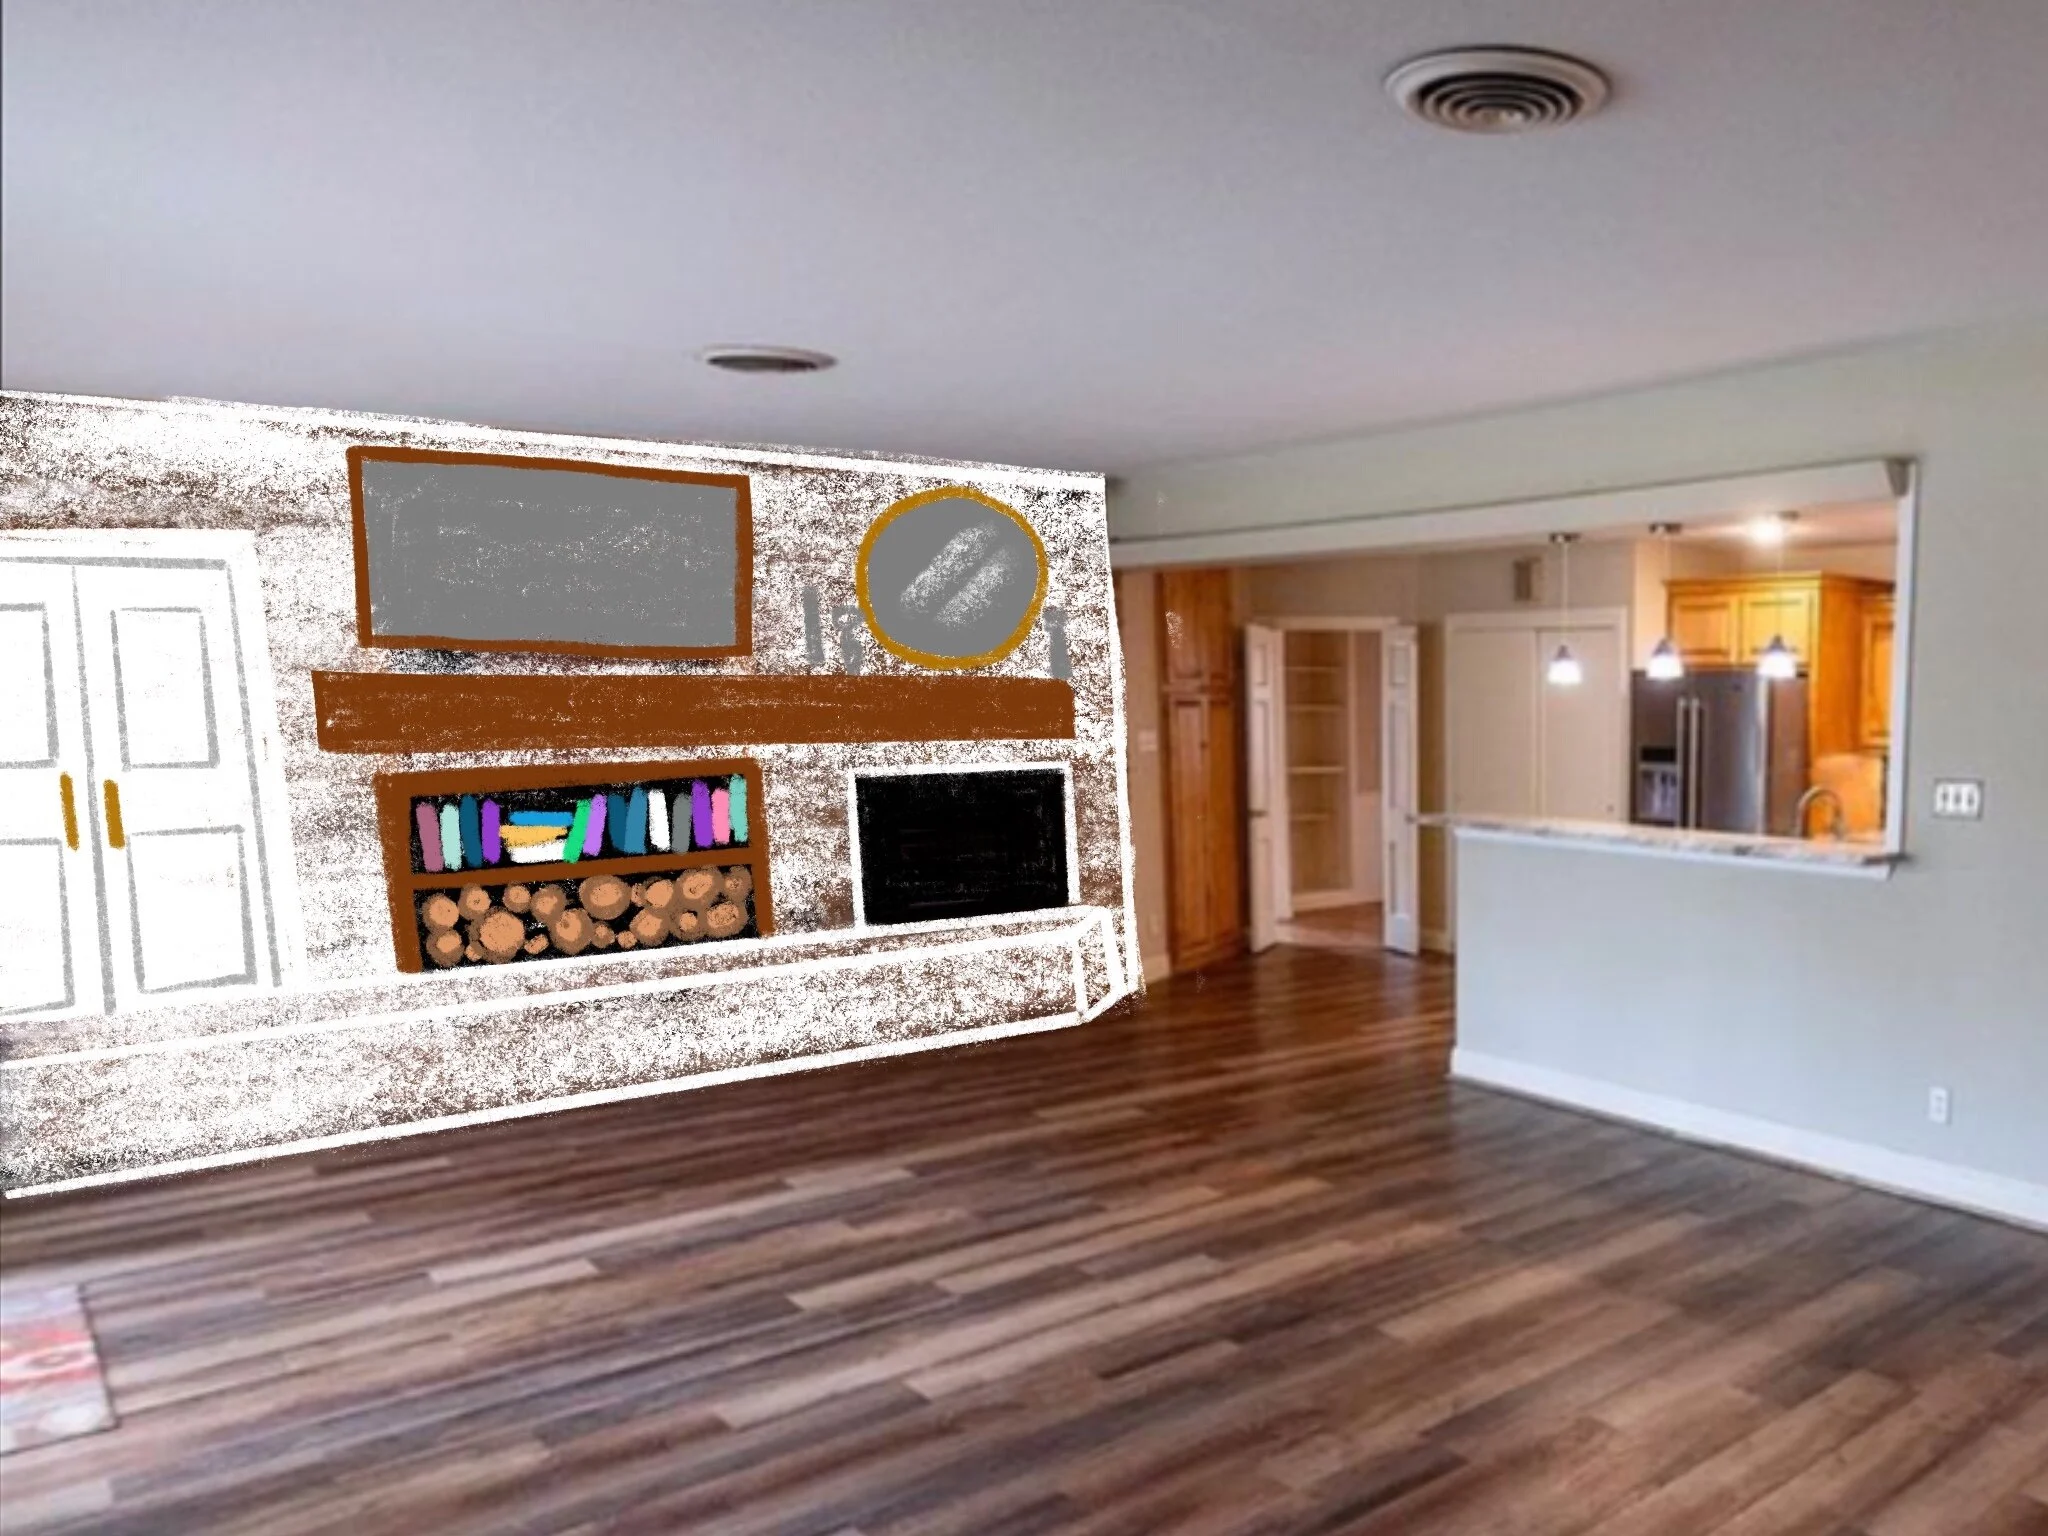
Problem: Ugly fireplace area. I loved the storage, shelving, and fireplace here, just not really anything else. The fireplace insert is not one I would have chosen, nor is the mantle or cabinetry style. So, this area is going to get some cosmetic touch ups.

IMG_0515.JPG

Solution: Lengthen the mantle and reconfigure the shelves. I love a good mid-century mantle, so I have a 10’ one planned for this space. I am hoping to adjust the middle shelving unit so that I can put a TV over the middle and still get to decorate over the fireplace.

There are lots of other little changes happening within these BIG changes, so I’m hoping to do some close-ups on them as they get completed. Tell me- what do you think of my plans? Which solution is your favorite? I can’t wait to see this home look cohesive, beautiful, and functional.


I’ll take the mid-century goodness without the housewifey-ness, please!

BEFORE tour of the #AnglinAbode

AnglinAbode, HOMElissa-anglin1 Comment
320822ndSt-8802.jpg

I sure hope you, my lovely blog readers, are prepared for LOTS of house posts from here on out! Truthfully, I love a good before and after and really want to document the renovation process well- and this little space is the best place to do it!

This is our 3rd home to purchase, and though it happened pretty quickly, we had been pondering it for a while. I have always been an old-home lover, and preferred fixing up an existing home rather than building a new one. There is something really special about the unique nooks and crannies, creaky old floors, and history of an old home to me. So for several years, Shawn and I have been talking about buying an older home to buy and make ours- keeping consideration for the original features and personality of the home while adding in some modern conveniences.

We absolutely loved our old home (photos in my last post), but we’d reached the point where we were hesitant to make any more improvements to the home, lest we over-invest in the property and not be able to get our money back when we sold. So, we had our eyes on a few different neighborhoods in our city- ones where we believed we would be able to invest a good chunk of change into a home and still see a return.

Thankfully, one of our best friends is a realtor (and a killer one at that! If you need one in the Lubbock area- Jim Archer is your guy!), and was very patient with us as we would randomly text him Zillow listings, asking for his thoughts on a property- yes, we were THOSE people, haha. After a while, Shawn and I decided we needed to quit our Zillow hobby and just be content.

Sure enough, one Saturday a couple of months ago, Jim called us and said he had found a house that might work for us. We’d already seen the listing, and weren’t super excited about it, but we went to see it anyway because it is in one of our favorite neighborhoods. Seeing it in person didn’t help our attitudes about it. It was sort of hodge-podge, as many homes in this neighborhood are, and had been renovated maybe 2 or 3 times already- none of which was in our taste.

So, we pulled out of the driveway with kind of a “bye, Felicia!” attitude, and then turned the corner to see the perfect view of one of our favorite parks- literally a block away. And then the more I thought about it, the more I was able to have a vision for what we would do to make it ours- to pull it together to feel cohesive and cozy.

The location is one of the biggest perks- as well as the fact that we are getting an additional living space, another bathroom, and 4th bedroom. The square footage is still about the same as our old home, but the backyard is nice and large with big trees.

But I knew I’d want to do some big-time renovations. Like, an entirely new kitchen type big. And completely redoing all the bathrooms, plus at least one other project in each room. So the numbers had to work. Shawn and I had already decided that the proceeds from our 2nd home needed to cover all the down payment/purchasing expenses of our new home PLUS the entire renovation budget, which is a lot to ask. We ran lots of numbers and several different scenarios. Jim was super helpful with this and it was really nice to have an outside opinion that understood our overall goals in purchasing this home.

We put in an offer. They countered. We countered again, and they accepted. And suddenly, we were buying a home!

Our main goals for this house are:

  1. Make a great investment. Don’t over-invest in the property- be smart with our renovations and improve it so that we are able to sell it (if we want to) for a profit.

  2. Make a great home for our family. So much of this purchase was about the neighborhood. We are SO excited to be close to 2 parks and a coffee shop, plus a lot of other families with kids the same age.

  3. Create a welcoming space for others. We believe that this never would have worked out had God not gone before us in it- and want our home to be a place where people feel God’s presence.

  4. Create functional workspaces for both Shawn and I. Since we both office from home, this is also a priority and boy have we realized that during quarantine! Ha!

We chose to go ahead and start with the kitchen and flooring renovations first, move in with my parents for a few months, and put all of our stuff in a storage unit. We had been warned that living through a kitchen reno isn’t for the faint of heart- and because we had the option of staying with my parents, we took that opportunity quickly! So thankful they are willing to put up with 5 more people in their home.

So without further adieu, here are the “before” photos of our new home!

I wasn’t able to get a straight-on view the day I took photos, because there was already a dump trailer in the driveway- ha! I love the wide porch, circle drive, and large pew that the previous owners left on the front porch. In this photo I’d alrea…

I wasn’t able to get a straight-on view the day I took photos, because there was already a dump trailer in the driveway- ha! I love the wide porch, circle drive, and large pew that the previous owners left on the front porch. In this photo I’d already moved all my plants over.

Front entryway.

Front entryway.

Front entry hallway. This is actually a very wide hallway that I really want to make great use of.

Front entry hallway. This is actually a very wide hallway that I really want to make great use of.

Front bedroom. I am thinking this will be the guest bed/my office. I love the light in here!

Front bedroom. I am thinking this will be the guest bed/my office. I love the light in here!

Front living area. We are hoping to put Shawn’s desk and a small living/tv space in here.

Front living area. We are hoping to put Shawn’s desk and a small living/tv space in here.

The front entry hallway ends in this room which is the back living space. It was originally the back porch of the house.

The front entry hallway ends in this room which is the back living space. It was originally the back porch of the house.

The room is open to the kitchen.

The room is open to the kitchen.

Another view of the kitchen. The door on the right is the master bedroom.

Another view of the kitchen. The door on the right is the master bedroom.

Looking into the kitchen/back living space from the east hallway.

Looking into the kitchen/back living space from the east hallway.

This is an odd little sitting area off the master bedroom. To the left of this window is the master closet.

This is an odd little sitting area off the master bedroom. To the left of this window is the master closet.

Opposite view of the sitting area. The door on the right opens to the front bedroom closet which is a bit odd.

Opposite view of the sitting area. The door on the right opens to the front bedroom closet which is a bit odd.

Master bedroom

Master bedroom

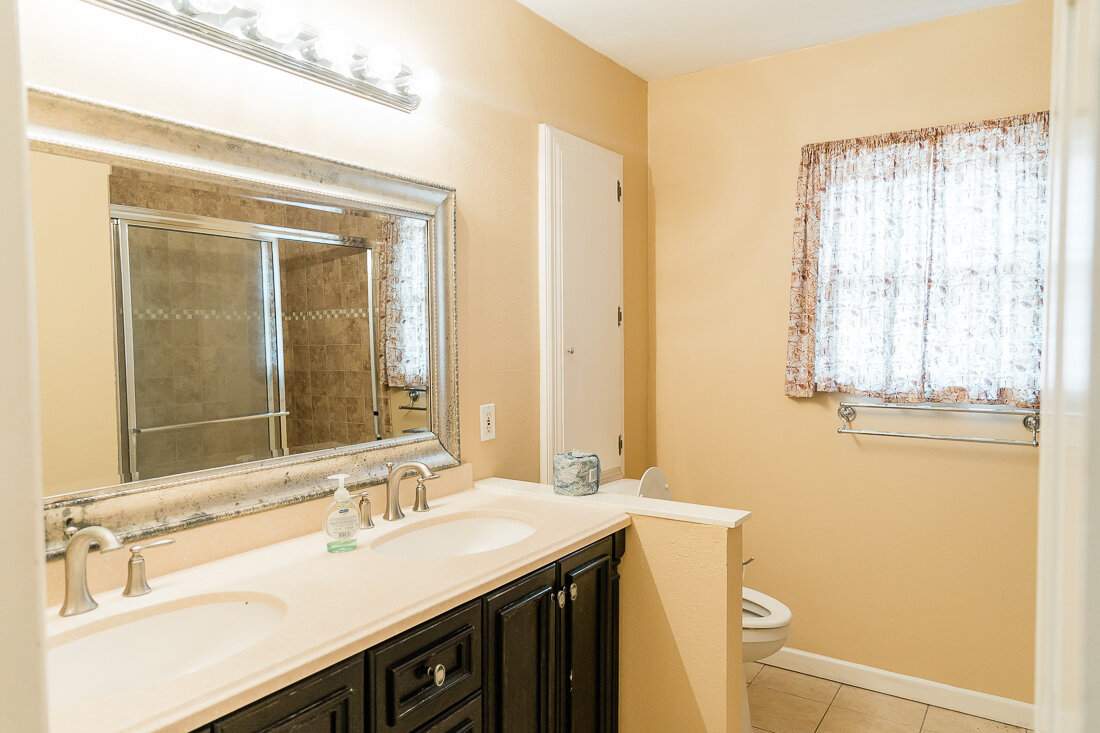
Master bath- this is through the left door in the above photo.

Master bath- this is through the left door in the above photo.

Laundry room- this is through the right door in the master bedroom photo. We moved over our deep freezer and Christmas tree- that is not a body bag! Haha

Laundry room- this is through the right door in the master bedroom photo. We moved over our deep freezer and Christmas tree- that is not a body bag! Haha

East side hallway- connects the kitchen to the kids’ bedrooms and guest bathroom.

East side hallway- connects the kitchen to the kids’ bedrooms and guest bathroom.

Back bedroom

Back bedroom

Small ensuite bathroom in the back bedroom.

Small ensuite bathroom in the back bedroom.

Hall/Guest bathroom

Hall/Guest bathroom

Front bedroom

Front bedroom

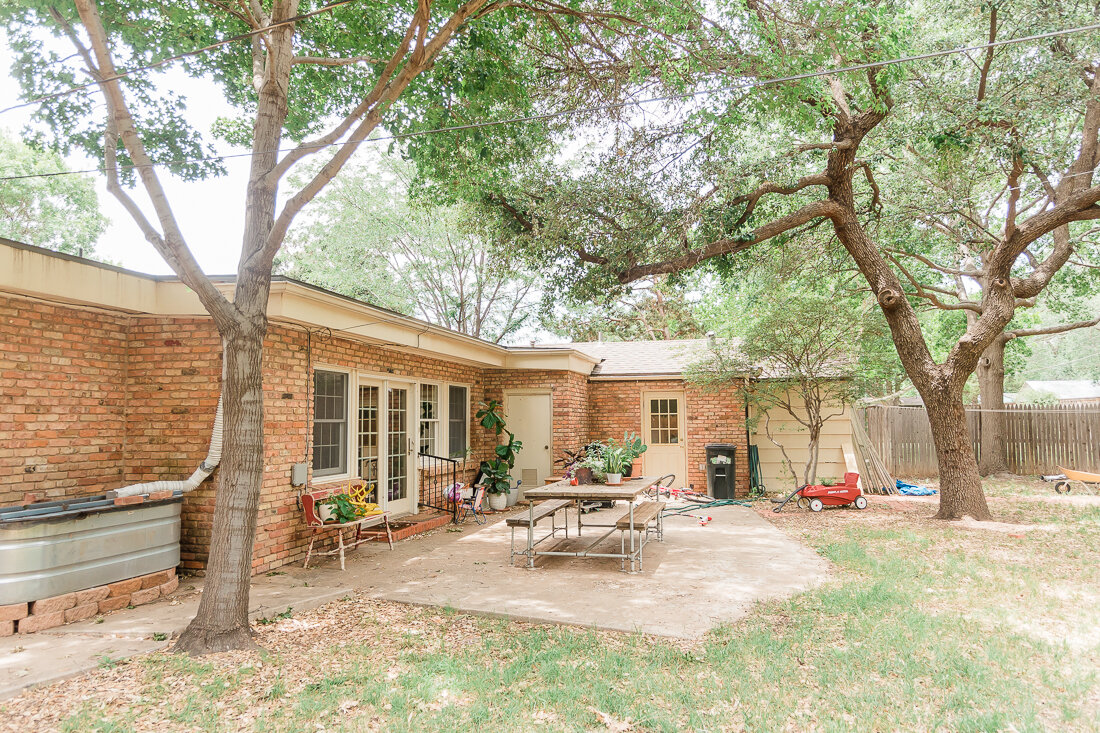
And backyard! We moved all of our “outside stuff” over, so it is a bit of a mess right now.

And backyard! We moved all of our “outside stuff” over, so it is a bit of a mess right now.

Planning on lots of sweet memories here!

Planning on lots of sweet memories here!

There you go! Next up I’m going to show you the work that has already been done- our contractor did NOT mess around getting started!

Tell me what you think! What do you like best? What would you get rid of first? If you want a sneak peek of what I am envisioning, come follow me on Pinterest!

This has already been such a fun project. Thanks for tuning in!